Stir Fry Technique II: Ten Steps to Better Chicken From a Wok
I never expected the huge response I got to my first post in this series: Stir-Fry Technique: Ten Steps to Better Wok Cookery, but I suppose I should not have been surprised. I have known for a long time that most Chinese cookbooks do not go far enough in explaining technique, particularly, when it comes to adapting wok cooking to American stoves. The exceptions are Grace Young’s two books, Wisdom of the Chinese Kitchen and Breath of a Wok, both of which are excellent volumes for either the beginning or intermediate student of Chinese cooking.
When readers started giving me feedback, however, I realized that I had only touched the surface of the subject, and so, a series of posts is born, all of them heavily illustrated with photographs. While the first post is a general overview that I suggest everyone read, the following ones are going to deal very specifically with the basic techniques in the context of different ingredients.
This post, as noted above, will deal with chicken.
Chicken is apparently very difficult to stir fry, and part of the problem lies in the chicken itself. For one thing, most chicken available in the grocery store meat counters is processed more than it needs to be. It is always previously-frozen, and often, it has been injected with water, which renders the meat very soft, mushy, and full of fluid. When the chicken hits a hot surface, water often bubbles out of the meat, and lowers the heat of the pan. When one is cooking in a wok, this can be catastrophic, as the entire point of stir-frying is to cook the food as quickly as possible, on as high heat as possible, with as little oil and added liquids as possible.
The result of chicken which weeps liquid is often dried out, overcooked meat (this comes about from having to cook the chicken longer, because the temperature of the wok is decreased by the release of water), and an insipid, diluted sauce, which simply does not compare with the flavors the local Chinese restaurant is able to create.
So, here are a few general rules about cooking chicken in a wok that will help counteract the tendency for it to become overcooked, tough and flavorless.
Rule 1: Choose your chicken wisely. For general cooking purposes, most grocery store chicken is okay. For stir-frying, you want chicken that is as minimally processed as possible. That means, you want meat that has not been injected with water if at all possible. How to manage this? Well, I will tell you that I always use locally raised, free-range, organic birds for my stir fries, and not only does the meat taste better in and of itself, it is -never- injected with water during processing. Try picking up a chicken breast from a small local producer sometime, and feel the difference in the texture of the meat. Even if it has been frozen, the flesh does not feel slimy, mushy or squishy. It is always silky and firm. This chicken will produce a superior stir-fry, not only because it will not weep water as soon as it hits the wok, but also because it will have a better texture when you bite into it. You may also notice that it tastes better. More chickeny, as it were.
Rule 2: Cut your chicken properly. This means you really do need to pay attention to how uniformly you slice the meat. It is said that Confucius so valued properly cut up food, that he would refuse to eat a dish that had food cut in a jumble of sizes and shapes. This is not simple food snobbery, this is recongizing that in the high heat generated within a wok, if your food is not cut in similar sizes and shapes, some will be overdone, and some may be underdone, and very little of it will taste good. So, practice cutting your chicken into small sized pieces, and work at it until you can manage it well. (Partially frozen chicken is easier to cut than completely thawed chicken, however, make certain it is completely thawed before you start stir-frying, lest you have partially underdone food!) I suggest for most people stir-frying on American stove, that they cut most chicken bits to be no thicker than 1/2″,.and the length at about 1 1/2-2″, with the width at about 1/2″. If you cut your chicken thicker than 1/2″ you will likely dry the outer edges of it before the inside is completely cooked, unless you employ a secondary technique, and stir fry the outside, and then add liquid to “braise” the inside until it is done. Then, you let most of the liquid boil away and continue stir frying.
Rule 3: Do not crowd your wok. The quickest way to ruin a stir fry is to lower the heat on your wok by overcrowding it with cold meat. I have no idea how large your wok is, so when I tell you to cook all of the chicken at once, you may have to improvise. If your wok is smaller than mine, and frankly, most people’s are, then you will need to cook your chicken in batches. (Now you see the value of buying as large a wok as your stove can efficiently heat.) That is fine, and it is easily done. What you do is split your chicken into however many batches you think your wok will necessitate, and also split up the aromatics into an equal number of batches. Then, all you do, is follow the recipe up to cooking the chicken. You do batch one, then scrape out the wok into a clean bowl, then do batch two, and do the same, and so on. Then, either add your chicken back into the wok and cook your vegetables, or cook your vegetables, add the chicken and finish out the dish. Experiment–only you know how big your wok is and how hot your stove is. Wok cookery requires flexibility and creativity–so exercise those abilities in your kitchen and use my recipes–and anyone’s, for that matter–only as guidelines.
Now, we come to the recipe that I am using to teach “Barbara’s Ten Steps to Better Chicken From a Wok”: Stir Fried Chicken with Chard, Fermented Black Beans and Chile.
I made up this recipe in order to accomplish several goals. One, I wanted to show how to stir-fry chicken with only a few other ingredients so the focus would be on the chicken, while still illustrating how to cook it with vegetables without overcooking the chicken or undercooking the vegetables. Two, I wanted to use as many local ingredients in this dish as possible in keeping with the May Eat Local Challenge, which is why I am using scallions instead of onions, green garlic instead of garlic, and chard instead of gai lan or bok choi, neither of which are in season here in Athens yet. (In using chard in place of bok choi, however, I have noticed that it does not contain as much water in its tissues as the latter, and so when it is added to the wok, it does not release as much excess liquid as bok choi. It also has more flavor–it is very earthy, and went beautifully with the dried shiitake mushrooms.) And finally, three–I wanted to show how to cook chicken with both a resilient vegetable like mushrooms, and a more fragile vegetable, like greens, to illustrated the principle of timing when cooking in a wok.
Stir Fried Chicken with Chard, Fermented Black Beans and Chile
Ingredients:
1 whole boneless, skinless chicken breast, trimmed of tendons and cut into pieces 1 1/2-2″ long, 1/2″ wide and about 1/4″ thick
1 tablespoon Shao Hsing wine or dry sherry
1 tablespoon premium light soy sauce
2 tablespoons cornstarch
4 tablespoons peanut oil (more or less, depending on the size of your wok)
4 scallions, white and light green parts cut thinly on the bias, dark green parts cut on the bias into 1″ lengths–keep them separate
4 green garlic, white and light green parts cut exactly like the scallions, and the dark green tops cut into 1″ lengths on the bias, and also kept separate
3 cayenne peppers, cut thinly on the bias (to taste–you can also use ones that are frozen whole from the summer before as I did.)
2 1/2 tablespoons salted, fermented black beans, lightly crushed (mash a bit with the back of a spoon)
1/2 teaspoon raw sugar
4 dried Chinese black mushroom (shiitake), soaked in 3/4 cup very hot water–reserve soaking liquid
1 tablespoon Shao Hsing wine or dry sherry
1 1/2 tablespoon premium light soy sauce
3/4 pound chard, washed and cut into 1 1/2″wide pieces, stems and leaves both.
1/2 teaspoon toasted sesame oil
Step one: Cut your ingredients into equivalent-sized and shaped pieces.
As I noted above, the purpose in cutting ingredients into similar sized and shaped pieces is not only aesthetic, but serves the purpose of allowing the food to cook evenly and quickly in the extremely high heat of the wok. If, for example, you cut your chicken into a jumble of different sized pieces, not only will the dish not look very good–likely, it will not taste very good either, as some will be done just right, while others will be overdone and others will be underdone. So, that is the general reason why Chinese cooks cut foods destined for the wok into small, similarly sized and shaped pieces.
But how is it done?
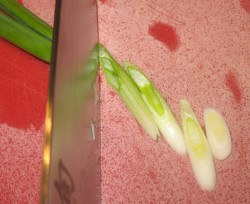
Let us look at the scallions first. I call for them to be cut thinly, on the bias. If you look at the photograph, you can see that I hold the knife at an extreme angle to the scallion, and slice it about 1/4″ thick. This results in a long, flat, ovoid slice, which not only looks nice with the long, narrow pieces of chicken and mushroom, but also serves a very practical purpose: it has more surface area exposed to the hot oil and wok than a typical round slice does. This means that can release more flavor into the oil as it cooks. The green garlic and chile are cut in exactly the same way, and since they are all going to go into the wok at the same time in this recipe, they are all put together in the same bowl, along with the fermented black beans.
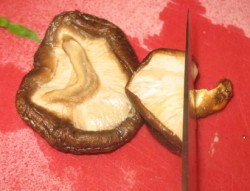
The mushrooms are another matter. They need to be rehydrated, so soak them in very hot water as directed for at least ten minutes. If they are still somewhat crunchy after this time, then stick them in the microwave for about forty-five seconds on high. This heats the water and almost instantly rehydrates the mushrooms. After you take them from the microwave, let them cool off a bit before you remove them from the water. If you do not let them cool off from the microwave, you will burn your fingers.
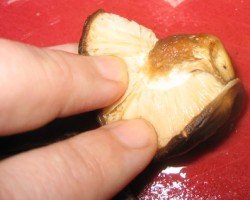
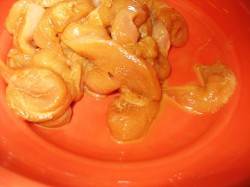
Squeeze out as much water as you can, back into the bowl. Then, in order to remove the stems, fold each mushroom in half with the stem to the outside. Press each down on the cutting board with the stem exposed and carefully with a sharp knife, cut off the stem as close to the cap as possible. The stems can be saved and used in soup stocks, though they are too hard and chewy to eat. Pour most of the mushroom soaking water into a clean bowl, leaving the dregs, with the bits of grit and dirt in it behind in the first bowl, and reserve the clean liquid.
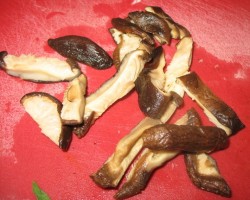
Then it is a simple matter of cutting the caps into four slices apiece.
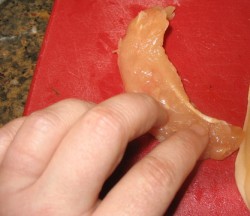
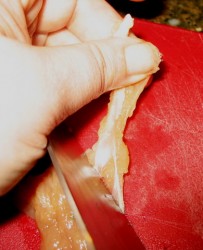
For the chicken, it is imperative that you trim away any tendons, excess fat or odd bits of membrane that you find. Every chicken breast half has what is called by grocery stores, “chicken tenders or tenderloins.” This little flap of chicken is very tender indeed, but it also has a thick, chewy tendon that runs the length of it. The flap of meat is found on the underside of the chicken breast. Pull it out and cut it off, and then using your off hand, grasp the exposed bit of tendon at the top of the chicken tender. Using the edge of your knife blade, scrap the flesh away from the tendon, pulling the blade gently down the length of the white, tough piece of ligament. After it is removed, then you can cut the tender into pieces as described in the recipe.
For the rest of the breast, I think it is simplest to cut across the width of each breast half (If the breast is not already cut into halves, go ahead and do it yourself) into slices and then trim the pieces into size. Remember, each piece does not have to be -exactly- alike and perfectly the same size, but they need to be roughly the same size and shape. Do not get hung up on either making each bit perfect or doing it quickly. Practice working steadily and you will pick up speed as you have experience.
As for the chard–it is so simple to trim off the very bottom of the stems and then cut each stem/leaf combination into 1 1/2″ wide ribbons crosswise, that I didn’t take a picture of the process!
Step two: Marinate your chicken in a mixture that includes cornstarch.
As I noted in the original post, the cornstarch serves several purposes. One, it thickens the marinade, helping it cling tightly to the chicken. Two, it browns when it comes into contact with the wok, which not only helps the chicken brown, but also develops the elusive flavor of “wok hay.” Finally, three, it thickens the sauce that you will create by deglazing the wok with soy sauce, wine and the mushroom water.
A properly proportioned marinade should cling so tightly to the meat that there is no liquid left in the bowl, as shown in the illustration. If yours is looser, then add a pinch or two more cornstarch until it sticks to the meat. Mixing it all together is a simple proposition of squishing the cornstarch and marinade liquids together with the chicken until the chicken is all coated and slippery. After that, you simply let it sit for about twenty minutes or so.
Step Three: Have all ingredients ready and lined up beside the wok, before you heat the wok.
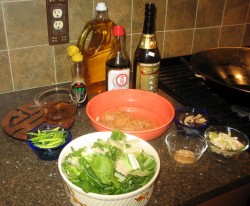
This is known in French as “mise en place,” and it means, “everything in its place.” Without doing this, stir-frying can be a harrowing, messy experience, so, before you set your wok on the fire, please, have your ingredients lined up, in the order that you will use them, next to the wok where you can grab them easily. You can see a good example of this in the very first illustration to this post, way up at the beginning.
Step Four: Heat your wok until it begins to smoke, then add the oil and heat it until it nearly smokes.
You have to get your wok as close to the heat as possible; this necessitates looking at your stove and buying a wok to suit it. If you have an electric stove, a flat bottomed wok is necessary. If you have a gas stove, like I do, you can use either a flat bottomed or a round bottomed wok on a wok stand; either one will work, but you must get your wok as close to the heat as you can and as hot as possible, so use the highest heat setting your stove will go to.
Unfortunately, I could not get a photograph of the white smoke that wafts up in a ribbon from a properly heated wok. It is an extremely difficult, ephemeral moment in time to capture on camera. However, I must reiterate, that you only perform this step if you have a carbon steel or cast iron wok. If your wok is nonstick, do not do this–you will ruin your nonstick surface and possibly breathe nasty chemical fumes. So, don’t go there.
However, if you have a well-seasoned carbon steel or cast iron wok, this is an essential step. When you put your wok on the heat naked, sans oil, and allow it to heat up, it opens the pores in the steel or iron, allowing the wok to “breathe.” When this happens, a thread of smoke will wisp up from the bottom of the wok and the scent of the wok seasoning will come with it. This scent is the basis of what the Cantonese call “wok hay,” or the breath of the wok. In my own inelegant way, I always used to call it “wok smell,” which doesn’t sound as poetic, but it is the same thing. It is the basis of what makes Chinese restaurant food taste so darned good, and which we are trying to capture at home. It will only take a few seconds for the oil to heat up; when it is ready, you will be able to see the surface of it “shimmer” with convection currents.
Step Five: Add your aromatic ingredients, in the order specified in the recipe and cook for a minute or two until they are fragrant and cooked to the point specified in the recipe.
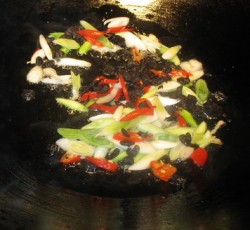
With this recipe, all of the aromatics go in at once; I wrote it this way in order to simplify things. However, for this recipe, the aromatics are stir-fried for only about a minute. They should not be allowed to take on color at all while they cook alone. They will brown plenty while the rest of the ingredients cook. When you are ready for the next step, which is putting the chicken into the wok, simply scrape the aromatics up along the sides of the wok which are cooler than the bottom.
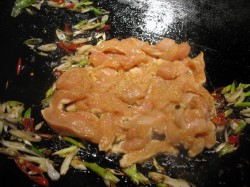
Step Six: Add the chicken, settle it into a single layer in the bottom of the wok and leave it there for about a minute or so to begin to brown deeply on the surface touching the wok.
This step is where most of the wok hay that you are going to have in your dish will build. And, it is probably one of the hardest things to will yourself to do.
As you can see in the accompanying photograph, the aromatics get scooted up the sides of the wok where they stay warm, but are not in direct contact with the very hot bottom of the wok. Then the chicken is added, and spread into as close to a single layer as can be managed–this is where knowing how much your wok will hold is important. Do not overcrowd the wok at this point, because you will cool it down and water will pour out of the chicken, and there will be no wok hay. (If there is any liquid left in the bowl from the marinade, reserve it. Do not put it in at this time!) Once you have it in a single layer, for this recipe you sprinkle the sugar on top of it, and then leave the chicken alone for about a minute to two minutes so that it can brown nicely on the bottom.
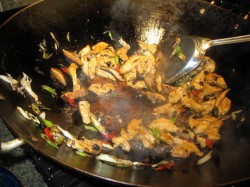
You will be able to smell this happening, but you can also with chicken see the edges on the side that is facing you begin to turn from pink to white. Be patient, and don’t start stirring right away. I know this is difficult. Once you smell the chicken browning and you see that the edges of some pieces are turning white, flip one piece near the center over with the corner of your wok spatula, and if you see a nice pattern of golden to reddish browning on it, start stirring, scraping the aromatics back into the wok proper to mix with the chicken. Throw in the mushroom slices and stir fry as normally until the chicken is cooked about 2/3 of the way–this means that about 2/3 of the chicken meat should be browned or white, and the remaining 1/3 pink.
You will notice that some of the cornstarch from the marinade has stuck to the bottom of the wok and is browning. Do not worry. This is going to be a good thing, as it will help make your sauce very full of flavor.
Step Seven: Add soy sauce, wine or some combination of the two to the wok and deglaze the cornstarch marinade, and toss the meat to season it.
Here is where the sauce starts cooking. Add the second amounts of soy sauce and wine, (and any remaining liquid marinade from the chicke bowl) and stir it around the wok, scraping up the bits of browned cornstarch so that the hot liquid can dissolve it. Then, stir in the meat and mushrooms, so that they all become well seasoned. This is the basis for your sauce, right here. It will look like very little sauce, it is true, however, the flavor will be full, bright and very, very filled with the natural flavors of the ingredients, particularly your aromatics. There is one remaining big step to making the sauce which will add to the bulk of it, so do not fear that you will have a “dry” dish. You won’t. This way of sauce making is typical of most Chinese homestyle cooking, and the results are delicious every time.
Step Eight: Add vegetables, in the order of how long they will take to cook, and stir fry.
Okay, in this case, we have already added the mushrooms–and in general–you can add your mushrooms earlier than any other vegetables. I like to add them to cook with the meat or tofu, because they all trade flavors back and forth the longer you cook them together. The chicken is lent some of the umami of the mushrooms, and vice versa. In fact, the longer you cook Chinese black mushrooms, the better.
So, that means you need to add your chard or other greens.
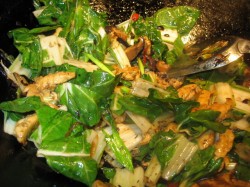
The goal in adding greens is to get them to wilt a little bit, but not turn into mush. The easiest way to accomplish this is to add them near the very end of the chicken being cooked, when there is just a touch of pink visible on the meat, and stir well for about thirty seconds and then go on to the very next step.
Which, is what we are going to do.
Step Nine: Add broth, any other sauce ingredients such as oyster sauce, hoisin or vinegar, stir fry until sauce thickens and clings to the pieces of food in the wok.
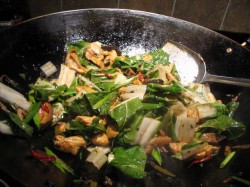
This is where the mushroom water comes in. Add half of it to the wok, stirring like mad to combine it with the rest of the sauce, and to let it help wilt the chard. If the chard does not cook sufficiently in thirty seconds, add the rest of the mushroom juice and stir some more. After a final minute of cooking, total, the chard should wilt just enough to mix well with the other ingredients (it should look like you only have half of the chard that went into the wok in the first place) and the sauce should all be thick and clinging tightly to the chicken, mushrooms and chard.
Take the wok off the heat.
Step Ten: Add garnishes, and any last minute flavoring items like spices or sesame oil, put into a warmed serving plate and serve.
First, toss into the wok the reserved scallion and green garlic tops, and give them a good stir to coat them with sauce and get them to wilt a tiny bit. You want them to remain essentially crisp, so thier flavor and texture remain quite fresh, as a contrast to the velvety texture of the wilted chard leaves.
The only thing left to add here is the sesame oil, which you always want to do at the last minute, preferably off heat, because toasted sesame oil burns and turns bitter easily. So, dribble into the wok while stirring and then you are done.
This looks more complicated than it is; in truth, once you start heating up the wok and then start cooking, this stir fry takes about eight minutes from start to finish. Of course, your time may be longer or shorter, depending on your wok and how hot your stove is.
Finally, before I go, here are a couple more hints to help you make stir-frying less stressful and more fun.
First of all, read each recipe through several times, and once you have your mise en place set up, read through the recipe again and make sure you have everything together, in the order in which it will go into the wok.
Secondly, keep your cool, and go at your own pace. If you have a one-handled wok and work on an electric stove, remember, you can always move the wok off the heat if the process seems to be going too fast for you. Then, take a breath, catch up and then when you need more heat, put the wok back on the heat. No sweat necessary.
If you have a gas stove, you can always turn down the heat a little bit to slow the process down. Sometimes, you cannot keep up, and so it is better to slow down than to risk burning an entire wokful of dinner. Once you have more experience stir-frying, you can pick up the pace and soon have food flying as fast as Martin Yan. But to begin with, take it slow and breathe deeply.
That is about all I can say on the subject of stir-frying chicken in one post, so, until next time, class is dismissed!
22 Comments
RSS feed for comments on this post.
Sorry, the comment form is closed at this time.
Powered by WordPress. Graphics by Zak Kramer.
Design update by Daniel Trout.
Entries and comments feeds.




Wow, excellent tutorial! I am a complete novice in Chinese cuisine, but value that “wok hay” smoke and smell when cooking Thai for the same reason. I will have to try this recipe as I have most of the ingredients and it looks wonderful.
Hmmmm…adding chinese cooking to my already-full Thai/Indian schedule – when I will find time to do things like work and sleep?
🙂
Comment by Diane — May 3, 2006 #
Wow, thank you for posting! I will have to print this out and give it a try sometime when I’m more awake. Are there differences in stirfry technique between Thai and Chinese or does one basically follow the same procedure?
Comment by Mel — May 3, 2006 #
Thank you, Diane–I am glad that you enjoyed the post.
Wok hay is wok hay, no matter what language you are cooking in–and it is always good!
Mel–in answer to your question, generally, yes, you would follow a similar technique in doing Thai stir fry as you would Chinese. There are differences, primarily in ingredients, which which means that the particulars are going to differ, but the general outline would be similar.
I will have to think on it a bit, and see where the differences are and maybe write a post about that, too.
Comment by Barbara — May 3, 2006 #
Since I am vastly ignorant about Chinese cuisine I can’t say exactly where differences are, but I know it’s important to have “hot wok cold oil” so things don’t stick in both. Same for the Indian tarka for that matter. And moving quickly, with all pieces chopped evenly (!) and all ingedients prepped and ready is the same.
The actual process is quite different it seems to me (at least as far as this recipe) – no cornstarch in Thai, and the “frying” of the curry pastes for Thai is critical to develop flavors before ingedients go in. But for fast, non-curry paste, stir-frys it seems similar.
Comment by Diane — May 3, 2006 #
Fantastic! I am going to try to reproduce this one myself. I’ve seen recipes that call for the cornstarch before, but without the explanation on what it should do and why it is there.
You know I put a lot of the books you recommended on my Amazon wish list, but actually I don’t need them so long as I keep coming back here! ; )
Comment by Meg — May 4, 2006 #
I know there’s lots of time for more Fisher Wisdom but already, I nominate this for Best Post of 2006 … or maybe a NEW category is needed … Best “How To” Post …
Comment by Alanna — May 4, 2006 #
Wow, it was an amazing process you laid out. i love stir fried dishes.
in the choice of chicken, may i add that older and bigger bird, which have accumulated some good fats makes a better candidate.
I prepare similar dish without any oil.
I just boil the chicken with lil water till all water evaporates and then add the ingredients and stir fry in it won fat. makes amazing dish..
Comment by Tony of the Bachelor cooking Blog — May 4, 2006 #
[…] From the same author, there’s also a guide to Cooking Chicken in a Wok – same technique, specifically for chicken. […]
Pingback by Now Is A Long Time Too » Wokery — May 4, 2006 #
Diane–yeah, that is why I said that it depends on what you are stir-frying in Thai food. But yes, I know of no Thai recipes that use cornstarch like that.
Meg–well, the books are still good! It just so happens that I learn a lot from them, and from experimenting and then synethsize it and put it out on the blog, but the books are still essential. If nothing else, Grace Young’s books are worht it for the stories, and in Breath of a Wok, for the photographs!
Tony–that sounds good. One could do a similar thing by rendering schmatlz (that is Yiddish for rendered chicken fat) and using that as oil with young chicken meat. Very kosher Chinese food!
Comment by Barbara — May 5, 2006 #
Oh, and Alanna–you are making me blush!
Comment by Barbara — May 5, 2006 #
You meant schmaltz not schmatlz.
…From my being a former copyeditor 😉
More importantly, thanks for this series of articles. I’ve never known how to cook in a wok properly. These articles are priceless to me.
Comment by Dan Jenkins — May 6, 2006 #
huh! there is way to many words for me dude!
Comment by George — November 5, 2006 #
huh
Comment by George — November 5, 2006 #
Barbara, there are blogs and sites with fusion cooking, but the way you described the wok coking in the 10 steps was most authentic, you have captured the essence of chinese stir fry. I was also amazed on how well u mastered the many techiniques in your indian cooking section, esp.the description of rogan ghosh.
Comment by Carol Miranda — November 17, 2007 #
Thank you, Carol–I appreciate your kind words.
I do study a lot of different cooking styles and cuisines, in part because of personal interest, but now, also because I am cooking in a restaurant and want to keep giving the guests new tastes to savor.
Comment by Barbara — November 19, 2007 #
[…] 50 Best Cookie Recipes on the Internet 29 Healthiest Foods on the Planet The 88 Least Healthy Foods Top 25 Food Hacks 10 Foods to Help You Fight Cholesterol Top 5 Brain Health Foods 11 Mood-Lifting Foods World’s 50 Best Restaurants 10 Tips for Low-Fat Cooking 10 Basic Cooking Tricks 6 Most Terrifying Foods in the World 8 Foods You Should Eat Every Day 100 Foods to Improve Your Productivity 50 Ways to Save Money on Your Grocery Bill 11 Things Dwight K Schrute has Taught Me About Food and Frugality 20 Lessons to Kick Start Your Cooking Skill Top 10 Detox Foods 7 Steps to Kitchen Frugality and Tasty Food 50 Sexiest Places to be Fed 10 Pantry Staples for Quick Cooking 10 Tips for Low-Fat Cooking 10 Best Foods You Aren’t Eating 25 Alternative Uses for Olive Oil 10 Easy Ways to Improve Your Cooking 20 Ways to Save on Groceries 100 Cooking Secrets 10 Ways to Cut Cooking Time 10 Tips for Vegetarian Diets 25 Best Food Markets in the World 10 Tips for the Greatest Grilled Cheese 62 Little Known Uses for Vinegar 6 Superfoods that Prevent Disease 50 Things Every Foodie Should Do Top 10 Specialty Chips Top 10 Restaurants of 2007 8 Steps to Hamburger Perfection 10 Tasty Breakfast Ideas Top 10 Food Movies 5 Easy Ways to Find Great Food When Traveling 10 Ways to Improve Your Cooking 10 Best and Worst Foods 15 Foods You Shouldn’t Live Without 10 Foods for a Good Night’s Sleep 50 Sites to Learn About Food 4 Foods to Fight Cancer 10 Frugal Food Hacks 17 Foods to Try Before You Die 10 Ways to Convince Anyone You’re an Ace in the Kitchen 10 Ways to Control Portions 100 Tastes to Try in 2007 10 Steps to Better Stir-Fry Chicken […]
Pingback by Eatingcleveland.com » Blog Archive » 50 Fabulous Food Lists: A Cleveland Food Blog - Cleveland Restaurant Reviews - Kitchen Product Reviews - Recipes — November 28, 2007 #
I hope you can help me out. I am trying to get my health under control so starting to eat right is my first step. Do you know where I can purchase quality food online? (that is on the healthy side) I am starting to do all of my shopping online because of various reasons…so I am hoping you can help me out with a suggestion or two.
So far I have only tried Celebrity foods (which is outstanding by the way)
I am in desperate need to grow my list of quality services or stores, where I can buy my food from. Thank you and have a great day or night (depending on when you read this. LOL!
Comment by leosatter — November 28, 2007 #
Leosatter–what do you mean by quality food/healthy food? Are you talking about fresh vegetables, fruits and meats or packaged items?
I will note that when I lived in Maryland, I knew of a local health food store that let you order by fax or online, and in the local area, they had a delivery service. Similarly, in the northeast, and in other big cities, you can order groceries from local stores online and have them delivered. I know that friends of mine in the Boston area used Peapod and were quite happy with it.
Be more specific so I can help you out.
Comment by Barbara — November 30, 2007 #
Hi Barbara,
I stumbled upon your blog a couple of weeks ago and have been looking through your archives. First of all I wanted to say thank you for such an instructive blog. This and the other ten step stir-fry article, in particular, were revelatory. I tried to make one of your other recipes using the techniques outlined here and it turned out so much better than what I had been making in the past! I just have a couple of questions and was hoping you could answer those:
First, I am usually cooking for either one or two rather than four, so I just halved your recipe. Is it correct to simply halve all sauce and aromatic ingredients? Second question is regarding the deglazing step: Because the pan was so hot, the sauce flash-boiled and most of it evaporated in a couple of seconds. I had to stir like mad just to get the sauce to coat the ingredients, so I had no time at all to scrape anything from the bottom. Was I doing something wrong? Is it because I halved the sauce ingredients and therefore did not have enough liquid?
Comment by EK — February 6, 2008 #
Hello, EK–sorry it took me a week to get to your question, but my Dad has been in the hospital recovering from open heart surgery, so I have been busy.
Yes, you should halve the aromatics, and in generally, most of the sauce ingredients.
However, when you are dealing with very small amounts of sauce ingredients and deglazing, the wok is very hot, and so it will flash evaporate. You have two choices–you could use more of the deglazing and sauce ingredients than a halved amount would be–reduce the liquid amounts by 1/3 say, instead of by 1/2–or you could also remove your wok from the heat briefly to cool it slightly before proceeding to deglaze. This will help, but you run the risk of overcooking your protein ingredients and vegetables that way. I think that the first method will work better for you at first, until you get to where you can maneuver your wok off and on heat quickly and efficiently.
Once stir frying becomes second nature to you, you will be able to move the wok around on and off heat very easily and it will all become instinctual to you.
Comment by Barbara — February 11, 2008 #