Cutting and Browning Onions For Proper Flavor In Indian Food
I had a reader ask me last week how I manage to cut my onions thin enough so they brown easily and completely for the proper Indian flavor. I tried to explain it completely with words, but I thought that it would be much easier to do an in-depth post with photographs to explain not only the process of cutting, but also browning the onions. I have found over years of teaching Indian cookery that many American cooks will stop cooking the onions much sooner than they should–they fear burning the onions so much that they will not cook them long enough.
So, when I teach Indian cookery in a classroom situation, I always emphasize the process I am showing here, and have the students all watch and participate in each step.
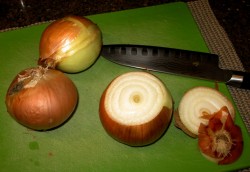
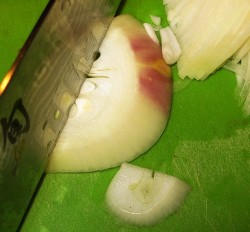
As you see from the photograph above, everything starts with cutting off both the root and top of the onions off.
Then, set the onion on one of the flat ends formed when the root or stem is cut off, and cut straight through the center of the onion.
Peel off the first layer of the onion along with the onion skin, and discard it.
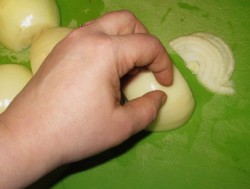
Then set the onion halves down on the large flat cut side. It will be very stable this way.
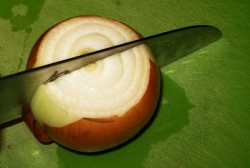
I use the sharpest knife I have to cut onions, and I like to use one with a hollow-ground edge, because the tiny divets created by this grind helps keep the very thin slices from sticking to the knife blade. Some people like to use smaller, short-bladed knives for slicing onions, but I prefer my seven-inch long santoku knife–that is a Japanese knife that is usually used for precision cutting vegetables, tofu, fruits, mushrooms, and boneless meats.
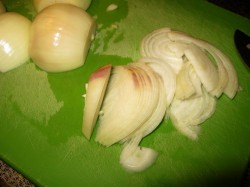
To hold the onion, tuck your fingertips under your knuckles as shown, and starting slowly, cut a very thin slice off the end of the onion. Cutting in the proper way, you will see each slice made of thin half-rings of onion. I find that if you saw back and forth slowly with the part of the blade closest to the handle, for the first part of the cut, you can stabilize the onion, and then continue the cut by pushing forward with the knife, then drawing the knife toward you while pushing down. This is called a “draw cut” and it is the easiest, and safest way to get a thin slice of a firm vegetable like an onion. With practice, you can make paper-thin slices of onion that you can see through with this method.
Continue cutting in this way as far as you can safely do so. The last half-inch or so of the onion is impossible to safely keep steady upright on the cutting board, so you lay it down flat. This way, it is steadier on the board, and you can cut it into very thin slices as well.
It doesn’t matter at all that these final slices will be in a different shape than the first slices, because the onions will cook down completely, and the shapes will be unrecognizable. So, do not worry overmuch with the shape of these last slices, just try to make them the same basic thickness as your first slices.
Continue cutting until you have the amount of onions you need for the recipe you are working on.
Before we continue on to the process of cooking the onions, I want to talk a bit about choosing onions for Indian cookery. Unless some other onion is specified in the recipe, plain old yellow onions are the best choice for Indan food. Why is this?
It has to do with the fact that they have the least amount of water in them of any other type of onion you can find in the typical American supermarket. Low moisture content is perfect for browning onions quickly and evenly, because the first step of the caramelizing process is to rid the onions of excessive water. This step also takes the longest time to accomplish. (I have been told by my friends from India, Pakistan and Bangladesh that the onions in the US are much waterier than the ones in their country, and so they take longer to cook down to a proper deep brown color and flavor.)
Whatever you do, resist the urge to use Vidalia, Walla Walla or Maui sweet onions, because these have even more liquid in them than the standard grocery store varieties. Save these to use as raw relishes or in uncooked chutneys and as garnishes for seekh kebab or grilled chicken where their sweet flavor and crisp, juicy texture will shine.
Now we come to the type of pan to use.
Whatever you do, don’t use a pan with a nonstick surface. Nonstick coatings interfere with the proper development of the darkened sugar residue that coats the bottom of the pan while the onions cook. You want the sugar from the onions that is leeched out of them with the water which boils off as the onions cook, to stick to the pan and turn brown. So, whatever you do, don’t use nonstick pans for your Indian food.
Secondly, use a heavy-bottomed pan which heats evenly. Thin-bottomed pans will heat up quickly, but they also tend to form hot spots on their bottom surfaces, which will lead to the sugars not only sticking, but burning. And this can happen within a matter of seconds.
My favorite pans to use for cooking onions this way are the enameled cast iron braising pans from Le Creuset. But, if you don’t have any such pans and can’t afford to get one, invest in a plain old Lodge cast iron skillet and cook in that. Not only will you make luscious caramelized onions and Indian food with authentic,deep flavor, you will also be adding iron to your food. Besides, such a pan will last several lifetimes of curry-making–you can pass it down to your grandkids, along with the secret for making perfectly browned onions.
The cooking medium you use for browning your onions is up to you, but I prefer to cook mine in ghee, butter or canola oil, depending upon the recipe, my mood and what is in the pantry at the moment. Just be certain to use a little bit more oil than you think you need, because while you want the sugars left behind by the evaporating water to stick to the pan and brown, you don’t want the onions themselves to stick and burn.
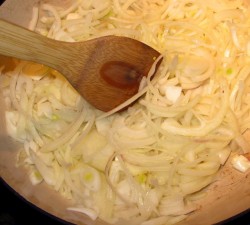
Heat the pan with the ghee, butter or oil, over medium heat until it is quite warm. Add the onions, and spread them out into an even layer covering the bottom of the pan with a flat-edged scraping tool, like a spatula. I like my bamboo spatulas for this job–they are inexpensive, sturdy, beautiful and durable–I throw them in the dishwasher, and they last for years. Try doing that with a hardwood utensil, and you will regret it!
Then, sprinkle the onions with a teaspoon or two of salt. Sprinkle it evenly over the top of the onions, and then give them a nice rough stir. This not only distributes the salt, but it also breaks up the onion slices–you don’t want them sticking together, but instead you want theindividual bits to separate, thus exposing the maximum surface area to the hot pan and oil as possible.
The salt not only seasons the onions, but also helps draw the water out of their tissues more quickly. You -can- do without it if you are dedicated to a low salt diet, though the process will take a little bit longer.
After you have stirred the onions the first time, leave them undisturbed for a few minutes, or just until some onions along the edges of the pan show a hint of color and you can smell the onions beginning to brown. At this point, stir the onions, and keep stirring. Stir, and stir, and stir, until you feel like your arm is going to fall off and your mind is going to go numb from boredom. And then, stir some more, because this is the key to getting the onions to release their water quickly and evenly, and it is essential to cooking your onions without burning them.
(Here is where I am going to make a confession. I have been cooking onions to a deep brown for so long, I usually do it without stirring them constantly. I can stir them, then go off and cut some other ingredient or parboil something or peel something, then go back and stir just in the nick of time, then walk away, and come back, just before they burn. This is because I can listen to the sounds of the onions cooking and smell the depth of browning without looking. This has taken me years of practice, and I do not suggest that beginners try to do my “Zen method” of onion cooking until they have gotten really good at the “Stir Until Your arm Falls Off” method. I will say that developing the senses necessary to do the Zen method of onion browning does allow for much more multi-tasking in the kitchen, which is invaluable, especially at work.)
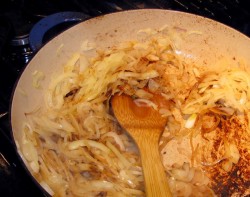
What you will see happeniing is your onions will go limp first. They wilt. Then, you will see juices bubbling out of them, and they start to turn translucent. Then, they turn golden, and this is where a lot of Americans want to stop cooking and call the onions done. Nope, Kemo Sabe, you are not even halfway finished. Keep cooking those onions, and you will see them start to turn to a nice, rich, good-smelling medium brown color that looks an awful lot like the photograph you see here.
See all of that reddish brown stuff stuck to the bottom of the pan, particularly in the lower-right hand corner of the photo? Well, those are those sugars I was talking about. What you want to do is get them off the bottom of the pan and integrated back into your onions, because that layer of browned sugars is filled with flavor. And, color.
There are two ways to get those sugars off the pan and back into your onions. One is the logical but sometimes more difficult method, and the other is the completely counter-intuitive but easier method.
The first, slightly more difficult way is to use the remaining liquid in onions themselves, to “deglaze” your pan. That means you gather up all of your onions, and slide them forcefully over the browned areas of the pan, scraping at the browned bits with your scraper/spatula. Sometimes, this works great, and the onions will pick up the color of the sugars, and the pan will scrape almost perfectly clean with a minimum of effort. Other times, the sugars will stick stubbornly, and all that will happen is you will get a sore wrist from all of that scraping;.
Which leads us to the counter-intuitive method. Add a little bit of water to the pan, and deglaze it like normal, by scraping up the browned bits, which dissolve into the water, and then, as the water is boiled away, is transferred to the onions.
I know you think I am nuts–didn’t I just say that the point was to remove as much water from the onions as possible? So why add more water?
What I have found is that in some cases, adding a tiny bit of water–about a quarter cup or so–to a pan of onions at the point where the onions have just started to turn reddish brown, and the sugars are clinging stubbornly to the bottom of the pan and are starting to edge toward bitter black rather than savory brown, adding water actually helps cook the onions faster. Too much stuff stuck to the bottom of the pan keeps the onions from continuing to cook, as it makes a buffer to the heat–dissolving that into water keeps the pan hotter, and helps the onions cook. And, for whatever reason, once dissolved from the pan bottom, the onions will cling to the onions as this added water evaporates, instead of once again sticking to the pan. Why this happens, I cannot say, but it does.
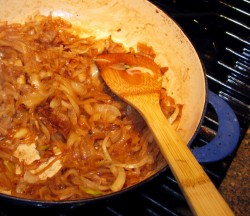
Whichever method you use to get those sugars off the pan and back onto your onions, do it, and keep stirring, until your onions are finally cooked down to an almost jam-like consistency, and are a rich, mahogany color–reddish brown. The color I wish my hair was naturally.
So, there we are. Deeply browned, caramelized onions. Why are they so damned great and what do you do with them once you have them?
First of all–they taste amazingly good, and without them, most Indian dishes that are supposed to contain onions, taste sort of weak and shallow. Browned onions are the bottom note, the basis of a curry, the starting point. They are the foundation, and without them, a curry can just seem one-dimensional. They add sweetness and an indefinable “brown taste,” and they completely lack any harshness. They also add color to many curries–a nice dark, reddish brown that is appealing to the eye, as well as to the tongue.
After they are cooked, you can leave them as they are, or grind them up into a puree. It depends on what texture you want your sauce to have–if you don’t mind it being somewhat chunky, leave the onions alone, but if you want it to be velvety smooth with no discernible lumps, puree the onions before adding them back to the pan with other aromatics, such as garlic and ginger, and spices.
So that is it. A primer on how to cut and cook onions properly for delectable Indian food.
27 Comments
RSS feed for comments on this post.
Sorry, the comment form is closed at this time.
Powered by WordPress. Graphics by Zak Kramer.
Design update by Daniel Trout.
Entries and comments feeds.



On a whim, I tried cooking onions this way to use for tacos (added to the ground beef), and it worked beautifully, too.
Comment by Kate — March 24, 2008 #
Can carmelized onions for Indian dishes be made in advance? If so, I have a method that avoids some of the stirring.
I found – by accident, of course – that it’s much easier to make a huge amount than a small amount. A small amount tends to burn. A huge amount doesn’t. Further (and this is where the accident occurred), I avoid the first part of “stir your arm off” for a *large* pot of onions by covering them and simmering on med-low for a while. This works during the “onions extruding water” stage. During this stage they’re simmering in their own liquid and therefore don’t burn. Then I uncover and stir a lot, as Barbara detailed.
(I use my nose to tell when I have to start stirring.)
Comment by Harry — March 24, 2008 #
Thank you so much for this! It’s beautifully explained and I’ve often wondered about the secret to proper Indian onions.
Comment by Mamlambo — March 24, 2008 #
I just recently overcame my fear of burning onions and managed to properly caramelize some. It does take a much longer time than I realized, but they are just divine. I have to admit I did try a form of the Zen method and managed not to burn anything much, but I agree it is a risky one.
In my case I was making them for a pizza topping, so I used a little sherry to deglaze the pan and that worked really well. Yum!
Comment by Alexis — March 24, 2008 #
I couldn’t agree more! This is a perfect description of how to do it right…
Comment by Diane — March 24, 2008 #
Wonderful explanation not just of the how, but of the why, of caramelizing onions.
Comment by Lydia (The Perfect Pantry) — March 24, 2008 #
Thank you, Barbara! I’ll use this method to make mejeddera next week. And this should work wonderfully with the fake chopped liver that I make from zucchini.
Comment by Hadar — March 25, 2008 #
I have long believed that well-caramelized onions are proof of a benevolent higher power who loves us.
Thank you for spreading the gospel! Praise the… onion… something!
Comment by Kristen — March 25, 2008 #
Delurking to say thank you for the site, Barbara! I have pretty much just started trying to learn to cook Indian food, and this has been one of my most useful resources.
I do have a question, though. See, I’m violently allergic to onions. Can’t eat them at all. I don’t have problems with things in the same family (leeks, garlic, etc.), so I use shallots for just about everything. However, I haven’t tried any curries with a caramelized onion base yet, because I can’t manage to find out whether shallots will be too different from onions to work. I don’t see why they should be, but I have made a few non-curry recipes where people said the shallots were worse than an onion version, and it’s a bit worrisome.
Do you have any thoughts?
Comment by Lila — March 25, 2008 #
Great instructions Barbara!
For anyone who wants to know…this is also how you make the base for French Onion Soup.
Lila…to mimic the flavor of onions you can add a tiny bit of aesofotida to curries and tarkas. It’s used in India by those who cannot consume onions or garlic for religious reasons. Aesofotida is the dried, crystalized sap from a perennial bush. It’s mostly grown in Afganistan. Some people say it smells to high heaven, but I’ve never even noticed an odor in my kitchen. It does smell a bit when you open the jar, but it’s brief.
You could also do a combination of roasted garlic and caramelized shallots and leaks. The flavor won’t be as deep as onions, but it would be lovely none the less
Comment by Roxanne — March 25, 2008 #
“Stir, and stir, and stir, until you feel like your arm is going to fall off and your mind is going to go numb from boredom.”
I always read while I’m cooking–at least while I’m cooking things like this where I have nothing to do but stir. It works beautifully. Stir with one hand, hold book with other.
Comment by Christy — March 26, 2008 #
Thanks so much! This was exactly what I needed, and answered questions I didn’t even know I had. I’ve had fine results so far, but following this method definitely went better. I’m learning so much from this blog, and learning all this new cooking stuff is really taking the edge off the transition to being a SAHM.
Comment by Molly — March 26, 2008 #
Lila: I do sometimes use shallots when I cook Indian food (when I – horrors! – run out of onions). I don’t know if they get *as* carmelized, but they do brown up well and the flavor is good. I would say in a pinch you could try them, although the color cues are not the same. Thy key thing is to cook them until they get past the raw stage, past the brown around the edges stage, and right to melting, falling apart browny goodness. They have less water so keep an eye on them to be sure they don’t burn.
Comment by Diane — March 27, 2008 #
Lila–you can definitely use shallots–follow Diane’s admonitions to watch them carefully as they are certainly less moist than onions and will thus cook faster.
To make up for the difference in color, you could add a tiny bit of Kitchen Bouquet–which is just caramel, after all. It would darken up the shallots nicely and give the proper color to the curry.
You could try leeks, but the texture would be quite different, and I am not sure that it would be good.
Roxanne’s idea is a good one, too. Add more garlic to your dishes, preferably some of it roasted, which is not an Indian technique, BUT, it will help boost the flavor of the shallots.
Oh, and I know two other people who are allergic to onions like you are. It is a crappy allergy to have especially if you are dining out.
Christy, when I make barfi or kheer, I read while I stir! It helps the long stirring time go by faster.
Molly, I am glad that you are enjoying my blog–it always makes me happy to know that I am helping people along. Good luck on learning the ropes of SAH motherhood. It is a challenging lifestyle–don’t ever let anyone tell you it isn’t!
Kristin–I like your Gospel!
Hadar! I hope this method works out for you! And I bet that the fake chopped liver is great, too. Mmmm.
Alexis–sherry or Shao Hsing wine are perfect for deglazing caramelized onions for non-Indian foods. Those two wines were made to go with caramelized onions, it is just so perfect.
Harry–you can make a large batch and freeze them for certain.
I’m planning on doing that at work sometime–go in and make a huge batch of these, then break them up into portions that I would use for a typical curry special, and stick them in the freezer.
Our “stove” at work is slow heating, so it takes a while to really caramelize the large amounts of onions I cook for dinner specials. It might be more efficient, time and energy wise, to do the caramelizing all at once. And the freezer would not hurt the texture or flavor at all–just be sure to put them in airtight containers.
Comment by Barbara — March 27, 2008 #
Mejedderah turned out perfect – just like my grandma’s! Thank you so much for this.
http://vegetableadventures.blogspot.com/2008/04/perfect-mejedderah.html
Comment by Hadar — April 5, 2008 #
And so did my spring soup!
http://vegetableadventures.blogspot.com/2008/04/split-personality-spring-soup.html
Comment by Hadar — April 5, 2008 #
Thanks so much, everybody! I’ve been experimenting, and find that caramelized shallots and a little roasted garlic works beautifully, especially if the recipe has garlic going into it in other forms as well.
Also, Barbara, thank you again for describing this procedure, as it has also explained to me why I would occasionally get a curry at a restaurant which did not seem to have onions but nevertheless made me ill.
Comment by Lila — April 8, 2008 #
Thanks for the great instructions! It took me no less than 30 minutes from the time I put the onions into the heated and oiled pan (All-Clad), but I kept at it and they turned out very nicely!
Comment by z — August 17, 2008 #
Barbara, Great step-by-step instructions and nice pictures. This is how Indian curry base is made with onions.
Lila, Yes, you could definitely use shallots as a replacement for usual onions. It works good as well.
Roxanne, The original asafoetida what we get in India has a strong odor and gives added flavor to the curries. However, it is not used in all types of curries. But as you said, the asafoetida what we get here in the US doesn’t smell to high heaven. Also, it doesn’t even add any taste/flavor to curries.
Comment by Kusuma — August 26, 2008 #
I found this site while searching for a way to brown onions in Le Creuset for indian cooking. You nailed it. I made the mistake of covering my dutch oven when the onions were browning. This made the onions soggy. Another point about using cast iron for Indian cooking: if you are using non-enamaled cast iron, it might react with acidic foods like tomatoes.
Thanks for the post. It really helps.
Comment by Seafrog — March 3, 2009 #
Seafrog–I am glad to have helped.
Technically, when you cover onions while cooking them, you do it at a lower temperature, and you don’t brown them–this is called “sweating.” You can do it with onions, celery and onions together to extract a great deal of vegetal flavor without browning them. It is a classical French technique.
Comment by Barbara — March 3, 2009 #
we glad to know this process we are working couple n it will help in our daily use and
if i want to make a puree of this onions and want to keep in a bottle for a long time what should i do?
Comment by satnam aulakh — September 22, 2009 #
how does indian food get to canada?
Comment by cccfish — May 24, 2010 #
CAN SOME ONE AWNSWER ME!!!!
Comment by cccfish — May 24, 2010 #
CAN SOME ONE PLEASE ANSWER ME NOW!!!!!!
Comment by cccfish — May 24, 2010 #
why are my onions disolving in soups.
Never did before is
it the kind i,m using
Comment by bobbi — January 6, 2012 #
I have been trying to learn how to cook a curry for a long time and after all the advice from people and all the mistakes made I have finally learned that it is the onions that are the most important part of the curry! This page has just helped me in the kitchen and the chicken curry is fantastic, ‘lumpless’ and smooth.
Thank you Barbara. Your student from East London 🙂
Comment by Nawazish — January 7, 2012 #