Let’s Get Cultured: Making Yogurt
Long time readers probably know that I love to cook with yogurt, and that it appears in a great many of my recipes. I use it in mashed potatoes, curries, baked goods, pancakes, sauces, cheese dishes and lots of cold salads and raitas. It is, in fact a staple in my kitchen, so right before I started writing this blog again, I had decided to take up making my own yogurt.
I’d been told it was simple to do, and the results were better than what you can buy at the store, and generally cheaper.
Now, I have to cop to being very picky about my yogurt. I use whole milk Greek yogurt, which is strained, thus making it thicker and creamier in texture, and my preferred brand is Fage. But, I knew that the milk the folks at Fage was still from CAFO dairy cows, who are fed God-only-knows-what and are treated pretty abominably. I really wanted to use our delicious local Snowville Creamery milk that is from cows who eat grass, hay and the tiniest amount of grain, who are never fed bovine growth hormone, and who are beautiful and lovingly cared for on fields very close to my home.
The milk from cows who eat grass is structurally different from the milk from cows who eat grain and God-knows-what-all, and it is healthier for us. Snowville cream and milk are what my family drinks, so it made sense to switch over to making yogurt from their milk if I was serious about making sure to give my family the best food possible.
So, I had to take up yogurt making.
And, it really isn’t all that hard, but it isn’t something that you can kind of do slapdash and get really good results. Remember, I’m picky about my yogurt. I like it thick, tart, and creamy, so I had to work a bit to get the good results I wanted.
But the work was worth it and I can pass on what I learned to my readers and make your putative journey into cultured milk products a bit smoother than my own was. (Because, yes, readers, I DID screw up a couple of batches of yogurt. Yep. I was very sad I had no hogs to feed it to, just some cats, because two quarts worth if ick yogurt is too much for kitties to eat!)
So, first of all, let’s talk about tools.
The first and most important tool you need for making yogurt is NOT a yogurt maker.
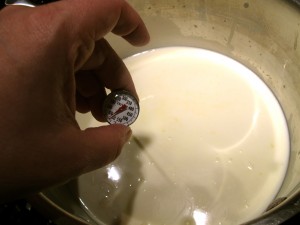
It’s a good, accurate food thermometer. Preferably with temperatures marked in five or ten degree chunks. Or a good digital thermometer. I have a Taylor that goes from 0 to 220 degrees–for yogurt you only need it to go to 160 degrees F. but you won’t find a probe thermometer that stops at 160, so don’t worry about it. It’s not a digital thermometer–I don’t love those because you cannot calibrate some of them, so I stick with the good old fashioned ones with the dial on them.
To calibrate a thermometer with a dial, check and see if there is a hex nut on the back where the probe meets up with the dial. If it’s there, you can test and calibrate it. Do this by setting up a glass of ice water and sticking the probe into it. It should read after a few seconds, exactly 32 degrees F. If it’s off by a bit in either direction, you will notice on the probe’s plastic cover (which you should always use when you’re not using your thermometer) a plastic hex wrench–a cut out the same size and shape as the hex nut–so you use that to move the dial up or down to get it to 32 degrees. Pretty neat, huh? You will find that right out of the package, your thermometer may be off by a degree or three in either direction, sometimes as much as five degrees.
Just calibrate it and get ready to play with milk.
Other necessary tools: a heavy bottomed pot that holds at least four quarts of milk–that would be a gallon. No, we are not going to make a gallon of yogurt at a time, but we going to be stirring two quarts of milk in this pot rather vigorously, and then whisking it, and you will make less of a mess if your pot is only half full than if it’s about to boil over.
A whisk. Self explanatory. A wooden or plastic spoon. A metal ladle and a four cup capacity liquid measuring cup.
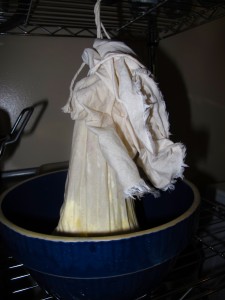
If you are going to strain your yogurt to make good Greek style yogurt, may I suggest that you obtain a bag made of fine cloth for doing so. I tried using cheesecloth and it was MESSY, and it let too many milk solids out with the whey, so I got frustrated and got some unbleached finely woven 100 percent cotton muslin at the local quilt shop–but you can get it in any fabric store–and sewed myself up some bags a little smaller than a standard pillowcase, and prewashed them, then hung them to dry. I use my bags inside out to keep the fraying bits of cotton on the seams from getting into the yogurt. You can also use a cotton pillowcase–lots of people on the ‘net suggest that. I just didn’t have any extra ones laying around.
But whatever you do–don’t do the cheesecloth thing–it will annoy the bejeezus out of you, and you will end up with far less yogurt in the end than you should, because lots of it will seep out of the cheesecloth no matter how many times you prewash it and how many layers you use.
Oh, and you need something to culture your yogurt in.
Here’s where a yogurt maker can come to play. You can use an electric one, but I don’t love them. They tend to use little tiny jars to make your yogurt in, but I use it in cooking, so I want to make lots of yogurt at a time. But if you want to make it to replace those little fruity cups of yogurt you buy in the store, then maybe the electric version with the wee jars is for you. We’re all different.
Or, you can use just a plain old two-quart glass jar with a towel wrapped around it placed inside an oven with a pilot light lit, or a warming oven, or a preheated 110 degree F. oven which is then turned off or inside a parked car, or in a styrofoam cooler with lots of towels wrapped tightly around it to keep it warm, or inside a thermos bottle with a towel wrapped around it set in a styrofoam cooler. All of these methods work, but I found that I got annoyed at keeping tabs on the temperature.
See, yogurt needs a temperature of about 110 degrees F. for about 8-15 hours to culture. And while all of these methods do work, they can require some fussing and futzing, and I got annoyed at all of that.
So, how did I decide to make my yogurt if I don’t like electric yogurt makers or the jar and towel in some insulated warming device methods? Did I do it in a crockpot? No, that bugged me, too. I wanted to do it without electricity if I possibly could because that just makes sense to me. (Being without power after the derecho storm for days probably had something to do with it, too.)
I decided to use a Yogotherm yogurt maker, which doesn’t use electricity, makes up to two quarts of yogurt at a time, and works much better than the jury-rigged methods I tried before I got it.
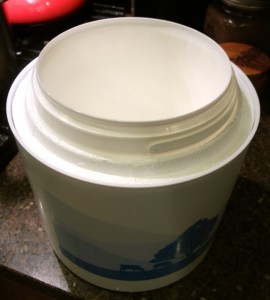
It’s a simple thing, really. A BPA food grade plastic bucket with a lid and a handle to hold the culturing milk, and a Styrofoam inner layer that the bucket fits very tightly to for insulation, and an easily wiped clean styrene outer layer that provides easy cleaning and looks nice and lasts longer than Styrofoam, because it’s tough and not apt to be destroyed by five year olds and cats.
No moving parts, no heating elements, and all easily washable.
I highly recommend it.
And then, you need milk.
I say that you should buy the best milk you can buy. I use whole milk, and I sometimes add extra cream for extra richness, but good whole milk will do fine for the first time.
Good milk, and oh, yes, some yogurt culture.
Now, you might be able to hike down to your natural food store and pick up a box of culture. Or, you can pick out your favorite natural unflavored brand of yogurt and use it–lots of people swear by Stonyfield for having the most live active cultures in any commercial yogurt.
Or, you can order some online from Cultures for Health. They have lots of different specific strains of yogurt culturing bacteria in freeze-dried form, and they give explicit instructions on how to activate them and whether or not they can be used serially to make new batches of yogurt from the previously made batch.
I did a combination of both methods: using commercial yogurt and two cultures from Cultures for Health–I chose a combination of Fage and Stonyfield yogurt and a combination of both Greek and Bulgarian culture strains. I added each one singly and ended up blending them together to come up with a really tangy, rich yogurt with good flavor and texture.
To use commercial yogurt as your starter, just follow my directions. To use Cultures For Health’s starters, first follow the directions they provide for activating the starter (basically you make a small amount of yogurt) and then following my directions, make a full batch of yogurt.
There are a couple of caveats I’m going to mention before I give the recipe/formula for the yogurt.
One–it is absolutely essential to heat the milk up to at least 160 degrees F. but no hotter than 180 degrees F. Yogurt cultures need milk between 90-110 degrees F. to work, but don’t think you’re being smart by only heating your milk up to 110 degrees and putting in your cultures and letting it go. IT WON’T WORK.
You need to heat the milk up to 160-180 degrees F. to denature the proteins in the milk so that when it cools off and the yogurt culture is added, it will turn into a nice, smooth, creamy, delicious dairy product that you will want to eat.
If you only heat up the milk to 110 degrees, and add your culture and let it sit, you will end up with a ropy, mucousal, slimy and icky mess of a dairy product that if you have hogs around, they will thank you for, but I guarantee, you will NOT want to eat. It’s nasty. It’s icky. It’s gross. Don’t go there, because I’ve already gone there for you.
Do not waste your milk.
That’s the first caveat.
The second is simple–make sure all of your tools and utensils and hands are perfectly clean before starting. If you are really OCD about it you can sterilize everything with boiling water–but don’t submerge your entire thermometer–just the probe–otherwise you break it. But you don’t have to be completely nutty about it. Just make sure stuff’s clean and well rinsed–detergent in your culturing vessel will make your yogurt not work right–and it will make it all taste funny.
The third is this–if you want, you can add powdered milk to your milk to boost the protein content and to make a thicker product. I personally have had good results without taking this step. But I will note where you can add it if you want, (After the milk has been heated and then cooled down to culturing temperature) and I’ll give you an amount if you want to use it. (About a half cup per quart of milk.) You can get organic dry powdered milk from Organic Valley.
Okay, now I think we’re ready to get us some culture!
Strained Greek-Style Yogurt
Ingredients:
2 quarts of whole milk (Or, a mixture of whole and two percent milk, or a mixture of whole milk and cream, etc. If you add cream, do it in this ratio: 7 cups milk and 1 of heavy cream)
1/3 cup of commercially available yogurt or “mother” culture made by following the instructions from the company that makes the culture
1 cup nonfat dry milk
Method:
I bet you never thought you’d read a recipe from me that had two or three ingredients, but here we are. I’m just full of surprises.
Set out your yogurt or mother culture to warm up to room temperature about an hour before you make yogurt. If it’s too cold, it will cool off your warm milk too much when you add it. You do not want this to happen.
Get out your big pot that holds at least four quarts, and your thermometer, wooden spoon, ladle, whisk and big measuring cup. Make sure everything is really clean and wash your hands really well. If your hair sheds, this is a good time to wrap it in a do rag, pop it under a hat or shave your head.
Pour your milk into the pot and put the pot on medium heat and start stirring. Get used to it: you’re going to stir a lot for a while. Don’t worry, it’s good for you. Builds character and forearm muscles.
Take out your thermometer and check the temperature with one hand while you stir with the other.
When it gets to 160 degrees, turn your heat down and keep stirring. At this point, you can keep it at 160 degrees for five minutes or you can slowly let it heat up to 180 degrees. I generally stop at about 170. I keep it at my high temperature for five minutes and then remove it from the heat. I set the pot on my counter, but you can also fill your sink with ice water and set the pot in there. That will help you cool the milk faster.
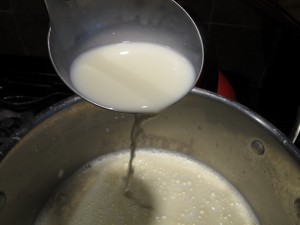
Cooling the milk is easy, but it can take a while. If you use a sink full of ice water, it will go faster, but just using your ladle to stir, scoop and let the milk pour back into the pot from a height of about seven to eight inches will cool the milk by about five degrees per eight minutes or so of work. It cools faster at first, but the last five degrees seem to take forever. Whatever, you need it to get to 110 degrees. Do not let it cool down past 90 degrees. 110 is what you are shooting for.
Scoop about a cup of milk and put it into the big measuring cup. Now is when you add the nonfat dry milk if you are going to use it. Whisk it into the milk in the measuring cup and do not stop until it is completely combined. If there are lumps in this milk, there will be lumps in your yogurt.
Whisk in your yogurt or starter.
Check your temperature. If it is below 110 degrees F, especially if it’s below 90 degrees F, you need to pop it onto the stove, and heat it up until it comes to 110 degrees and NO hotter. So put it on low heat, stir the whole time and keep that thermometer in the milk and when it gets to 108 degrees, take it right off the heat and turn off the stove. It will go up the next two degrees on its own.
Pour the yogurt into your culturing container, close it up and do whatever it is you are going to do to keep it warm. In the case of my Yogotherm, I just pour it into the plastic inner chamber, close the inner lid and then close the outer lid and leave it in a warmish, quiet place.
Now, leave it alone for eight to twelve hours. I get it ready before I go to bed and then check it in the morning.
After it’s been between eight to twelve hours, open up your container and see what has happened. What you should see is a thickened mass that is still somewhat fluid, but mostly solid. The cream will have floated to the top, and underneath it should be thickish yogurt.
Put it in your fridge and let it cool off and firm up for another five hours at least. I often leave it for eight hours. It thickens a good bit on its own while it cools down slowly.
Okay, if you just want regular yogurt, it’s done and ready to eat.
If you want Greek style strained yogurt, now is the time to get out your straining bag or pillowcase.
Pour your yogurt into the bag, twist the top and tie it with a string. Hang the bag from a shelf, a cabinet nob, a hanging pot rack or whatever other sturdy thing you can find to hang it from, with a bowl underneath to catch the whey. Put it someplace cool, where no cats, children or other flies can get to it. I hang it from a shelf in my utility room which I keep closed.
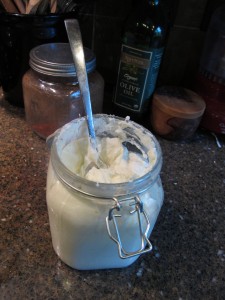
Leave it for two to three hours and when it’s done, scrape it into a storage jar, and whisk it lightly to distribute the cream.
The whey you can keep to put in soups, cook vegetables in, or to use as the liquid in bread baking. You can also use it as a starter for kimchi or sauerkraut. Or, if you have cats, you can give it to them, or you can make ricotta cheese with it, or you can feed it to your dog or hogs if you have them.
When all of this is done, you will have thick, creamy natural Greek yogurt at a fraction of what Fage costs in the store.
We’ve gotten to where we like the flavor and texture of the homemade yogurt much more than the commercial. It’s the quality of the milk and the different cultures I used in it, as well as the amount of cream I use in it that I think makes the difference.
Eat your yogurt however you like or use it in cooking. You just need to leave 1/3 cup of yogurt for culturing your next two quarts of milk which you should make within 7 days. After that, your cultures may die. I make my yogurt on Sundays.
3 Comments
RSS feed for comments on this post.
Sorry, the comment form is closed at this time.
Powered by WordPress. Graphics by Zak Kramer.
Design update by Daniel Trout.
Entries and comments feeds.



I’ve been making yogurt for probably over 5yrs now (though not too often lately since my toddler has a dairy allergy so I can no longer use it when cooking). My oven does a “keep warm” setting, so I set that to 110 and let it go. 8hrs is what we prefer, but I’ve done up to 24 for someone with a lactose allergy since after 24hrs all of the lactose has been consumed.
If I’m straining, I line a fine mesh strainer with a paper towel and that works great and is much easier to clean up than a bag. I also do a variation where I’ll cook down some fresh or frozen fruiit with a bit of honey, then stir in a packet of Knox geletin and stir the fruit into the yogurt while still warm to get grocery-store-style blended yogurt (I think it comes out too runny without the gelatin). My 11yo really loves that, and I love that I can control the sugar.
Comment by Delora — August 7, 2012 #
It’s funny you should mention this! I just saw a posting on a local LiveJournal community about a local yogurt co-op that’s looking for members. Basically, you pay $60 for 24 weeks’ membership, and each week, you get a quart of homemade yogurt made with milk from local dairies (either nonfat or whole milk). Two Tuesday evenings during those 24 weeks, you have to volunteer to be one of the people making the yogurt. I’m pretty tempted! I may have to do this! Granted, I’d get less than a quart a week if I strained it to make Greek yogurt, but still…
Comment by Laura B. — August 7, 2012 #
Barbara, thanks so much for posting this! I was thinking about joining a yogurt-making co-op here in my hometown, but decided I don’t really need another thing that requires my time when I might not have any time to give. Just making my own yogurt at home–when I have time–will be fine. I think I may invest in a Yogotherm. I like the idea of a non-electric yogurt-maker!
Comment by Laura B. — August 10, 2012 #