Beginning Again
 Like birds flying in a flock, days flew into weeks, into months and soon, years, and the silence on my blog became a nagging, wheedling presence in the back of my mind.
And then came the emails, like rain after a drought.
A trickle here, another there. The trickles merged into a stream, into a dancing cascade that eventually poured into a river.
“Where are you?” you said.
“Are you well?” “What’s happened?” “I hope you’re still cooking.” “Please tell us you and your family are well and happy.”
“What are you doing now?”
And, the one that finally pulled me back.
“We miss you.”
The truth is, I missed all of you, too. More than I can say.
So, I am back, and this post is going to help us all catch up, and the next posts will be about my kitchen experiments.
First–where am I?
I’m still in Athens, Ohio, living with the locavores and loving every minute of it. (Well, maybe not every minute. The crazy derecho storm and power outage during the heatwave was less than charming, but lots of people had it worse than my family, so I’m grateful. And yes, I have my power back. Else, I’d not be writing this post!)
Am I well?
Yes. I am quite well. As longtime readers might remember, I had chronic pain issues for years, and then was diagnosed with a Vitamin D deficiency. That has been mediated with liberal applications of oral supplementation, but then I started having weird neurological symptoms. Tingling and buzzing in hands and feet. Really weird migraines that felt like cascading needles over my head and shoulders. My new GP, whom I absolutely adore, sent me to a neurologist to have that sorted out. Turns out I’m severely low in Vitamin B12, which is probably a genetic thing. So, now I have a shot every two weeks and low and behold the neurological symptoms are gone.
And I feel healthier than I have in years.
Zak is doing well. He did cut his hair off, so now he looks probably ten years younger. Not quite sure how that works, but he’s happy and cute and healthy.
And Morganna is doing well. She’s on the saute station and grill station at a local restaurant: Zoe Fine Dining. She loves it. She took some time off from Ohio University, but she may be returning to finish her history degree in the fall. We’ll see. No need to rush things.
And Kat. Oh, she’s growing and is a joy to us all. She sings all the time–is always making up songs about everything she is doing or seeing or experiencing. She’s going into first grade in the fall, and she’s reading, writing, spelling, doing math and drawing beautifully. I can’t begin to explain how proud I am of her and how much I enjoy helping her grow up.
What happened?
Lots of stuff. The weird neurological things, I got tired of photographing dinner before I ate it and was burned out on writing.
Oh, and I started a new project. More on that in a moment.
Yes, I’m still cooking. I could never give up on cooking. Though, with a five year old, it’s sometimes hard to keep making up new recipes. Kids like their favorite foods and are not as tolerant of Mom having to cook up three to five new recipes a week when they’d really just like their matzo ball soup or spaghetti and meatballs or penne alla pesto or ma po tofu, thank you very much. But yes, I am cooking, and have started some really fun experiments in fermentation in the kitchen.
Yes, I intend to share those experiments with you.
So yes, we’re all well and happy, and so now we come to the final question:
What are you doing now?
What am I doing?
Well, I’m making a documentary.
A feature length documentary.
On the local food economy of Athens, Ohio.
It’s called “Hand to Mouth: The Athens, Ohio Local Food Movement.” And it’s going to be big.
My dearest friends are working on it with me. I’m producing and writing. Dan Trout–lots of you older readers will remember him as the one who eats whole cheesecakes at a sitting, until I defeated him with one of my cheesecakes–he’s writing, directing and is the cinematographer. Heather Irwin, who has evolved into a fairly fearless experimenter in the kitchen, is our sound technician. And Zak is doing the soundtrack–and is doing an amazing job at it, too.
On Wednesday, Dan and I are presenting a twenty minute chunk of the film at the Real Food, Real Local, Real Good Conference here in Athens.
We still have a few interviews to do and some b-roll footage to shoot, and then we go into post-production–writing the script and editing. After it’s done, we’re going to take it out on the sustainability conference and film festival circuit, and we hope to find a distributor. We want to get it in theaters, and get it seen as far and wide as possible.
But that’s a ways away. We still have to finish it.
So that’s what’s been up in my world.
I’m glad to be back.
Look for more posts on the film, but also some new recipes, and ideas on gardening, maybe a few essays and some documentation of my forays into fermentation and other food preservation methods.
Thanks for writing to me and asking about us all and most of all:
Thanks for being patient.
Hyderabadi Bagara Baigan: Eggplant Curry In a Peanut Sauce
In my last post, I described my general love of all things eggplant and gave a recipe for a Chinese way of cooking them.
In my litany of international ways with eggplant with which I am not only familiar but also adore, I left out one very important subcontinent: India.
That’s because I wanted to write a post specifically about Indian ways with eggplant, also known as brinjal.
In India, eggplant can be stuffed and baked, stuffed and simmered, fried, roasted and mashed, and, of course, cooked into a myriad of curries, from the dry to the saucy, with sauces based on tomatoes, onions, coconut milk, ground up nuts or yogurt.
I believe the creative culinarians of India have simply come up with more ways to cook eggplant than just about anyone else in the world. Well, maybe that’s a little bit of an exaggeration–but I don’t much care, because the simple truth is this–every Indian eggplant recipe I’ve tried, I’ve adored. There isn’t a single one I’ve tried that I’ve not liked. Not one. In my experience, each one is tastier than the last, or at least as tasty as the last and they are all just SO amazing.
It’s because eggplant is a flavor sponge that Indian spices just make them taste so amazing. What is really amazing is how well the eggplants soak up the spices without losing their own sweet or lightly bitter flavor. And, as always, eggplant has that rich, silky texture that makes it especially filling and satisfying without being heavy.
This particular recipe is a traditional Hyderabadi way of cooking tiny baby eggplants–like the ones I picked from the plants on my deck.
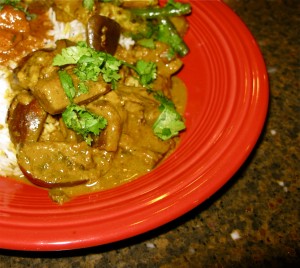
I tasted this dish just this week, on Tuesday, at Reethika’s lunch buffet. Cute whole baby eggplants were split into quarters without being cut completely apart and simmered in a rich, warm brown curry sauce redolent with spices in the foreground, and deep in the background was an addictive nutty sweetness redolent of well, it tasted sort of like peanuts, but not exactly. I thought it might have been peanuts mixed with toasted round urad dal or perhaps chana dalia, but I couldn’t be sure.
When I got home and started researching the recipe, I discovered that I was right about the peanuts, but the other nut flavor I caught was toasted sesame seeds. AHA! That’s why it didn’t taste exactly peanut like–but had another nut flavor mixed in as well. The other main flavoring was ground toasted unsweetened coconut.
Knowing I had plenty of baby eggplants to be used this weekend, I decided to try my hand at this delicious, unique curry. Of course, by the time I started cooking dinner on Saturday, I realized that some very important ingredients I usually had in my pantry were missing. But, more on that later.
When I picked my baby eggplants–some of them turned out to be too big to be really counted as babies. So, instead of just slitting the eggplants into quarters, I actually cut them into chunks. These I browned in peanut oil until they were just starting to soften and were maybe about half-cooked through. I set the eggplant aside, and browned a red onion cut into a medium dice in the same pan.
Back to those important ingredients that turned up missing.
I almost always have dry roasted unsalted peanuts in my pantry, as well as white sesame seeds and unsweetened shredded coconut.
However, once I picked my eggplants and had a severe craving for this peanut-sesame sauce, I discovered that Zak had eaten the peanuts, the sesame seeds had been borrowed by Morganna and the coconut had fallen into a hole in the space-time continuum and had ended up in another universe entirely.
Normal people would just make a different eggplant curry, but not I. My tastebuds were set for the peanut sauce and the peanut sauce I would have. I thought of going out the Asian market to pick up the peanuts, sesame seeds and coconut, but by the time I was cooking, the store was already closed.
So, I set to thinking.
While I lacked peanuts, I did have natural peanut butter, which is nothing more than peanuts ground up with a little bit of extra peanut oil and a touch of salt. And though my pantry was sans sesame seeds, I did have a jar of tahini, which is nothing more than ground up toasted sesame seeds. And though there was no coconut, I did have some coconut milk, which while it isn’t made from ground up coconut directly–it is made of ground coconut steeped in hot water until the flavor and fat is extracted.
I made the command decision to use these substitutions, to see if I could make a credible alternative to the traditional recipe.
I have to say that while I felt guilty for bastardizing the recipe, and I fully intend to make a more traditional version of it the next time I get my hands on baby eggplant, eating the dish cooked this way was fully as satisfying as eating it made the proper way. The only difference I could detect was that my version was a little smoother, and the sauce was a bit more rich, I think from using the coconut milk instead of ground coconut.
Other than that, even with the substitutions, mine was a credible version of a classic dish that is going to become a regular way to cook eggplant in my kitchen, and is worth knowing, especially for folks who don’t own a grinder that is up to the task of grinding peanuts, sesame seeds and coconut into a smooth paste.
Hyderabadi Bagara Baigan
Ingredients:
2 tablespoons peanut oil (cold pressed, unrefined tastes amazing here)
1 pound very small (golf ball sized) baby eggplant
1 medium red onion, diced medium (about 3/4 cup diced)
1 1/2″ cube ginger, peeled and minced very finely (or pureed)
2 cloves garlic, peeled and minced very finely (or pureed)
1 1/2 tablespoons natural peanut butter
1 tablespoon tahini
2 tablespoons coconut milk
1/2 teaspoon ground turmeric
1 1/2 teaspoons ground coriander seeds
1 teaspoon whole cumin seeds
ground cayenne chili to taste
1 1/2 teaspoons tamarind concentrate
1 1/2 cups water (or more as needed)
salt to taste
roughly chopped cilantro as garnish
Method:
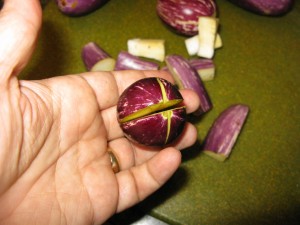
Cut the stem off of the baby eggplants carefully, peeling it away and leaving the fruits mostly whole. Cut an “X” from the rounded end (opposite the stem end) almost, but not quite through the fruit, nearly cutting it into quarters. (If your eggplants are bigger than golf ball sized, go ahead and cut them into quarters)
Heat the peanut oil in a shallow, heavy bottomed pan over high heat and cook the eggplants until they are soft, but still somewhat firm in the middle–not quite completely tender. Remove eggplant and set aside.
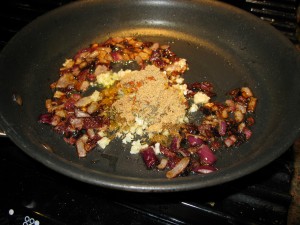
In the same pan, using the same oil, brown the onion, stirring, until it is a deep mahogany color. Add the ginger and garlic, then the peanut butter, tahini and coconut milk, and turn the heat down to medium and cook, stirring, until fragrant–about two minutes. Add the spices, and cook one more minute. Add the tamarind concentrate and water, and stir well to combine.
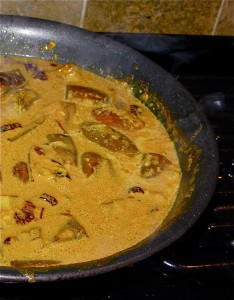
Simmer until the eggplants are fully tender and the sauce has thickened, adding water as needed to cook the eggplants all the way.
Add salt to taste, and sprinkle with cilantro as garnish.
This is great with chapati or rice, either one. It’s even better with both.
Twisting Traditions: Eggplant and Pork with Garlic Sauce (and Green Beans….)
Eggplant is one of my favorite vegetables of all time.
Even though, when I was growing up, it only appeared on my Grandma or Mom’s tables fried with marinara sauce (and there’s nothing wrong with that, mind you), fairly early on in life I was introduced to moussaka and baba ganoush through Mom’s Greek friends, Pete and Sylvia, and my Aunt Nancy, who’s half Syrian, and loved all sorts of eggplant-based goodies. (Half Syrian, half Portuguese, and ALL good. I love Aunt Nancy, who lovingly broadened my food horizons from a very early age, God bless her.) My Uncle George, Mom’s brother and Aunt Nancy’s husband, loved Eggplant Parmesan so much that it was the only thing he ordered at Joe Fazio’s when we went out to celebrate his birthday, but even so, he’d let me have a bite to try it when I was very, very small. Fried eggplant, great marinara and melted mozzarella cheese–what’s not to love?
But, when I was younger, the only eggplant I knew about or ate was the Rubenesque deep violet aubergines that are commonly grown throughout the Mediterranean and Middle Eastern regions. I’d never heard of, or even seen one of the long, thin, pale violet colored Asian Eggplants that are now fairly commonly seen in farmer’s markets, Asian markets and even some regular old grocery stores around the US.
They don’t even really look like eggplants being that they aren’t egg shaped, but are instead slender and curved, like long, stretched out teardrops. Most commonly they are either deep purple, like their plump cousins, or a pretty rosy violet color, but sometimes they are white, or striped violet and white or even a pretty mint green.
No matter what color these pretty Asian eggplants are, they have several things in common. One, when picked young, they have very few seeds. Two, they almost all lack any of the bitterness which can sometimes plague the more common chubby eggplants, and so never need to be pre-treated with salt. Three, they do share the ability to act as sponges with their larger cousins, and so are very good at taking up and holding flavorful sauces and oils.
They are used in the cuisines of China, Japan and Thailand, where their abilities to soak up flavor is used to great effect. In Japan, they are grilled with a miso marinade, in Thailand they are cooked in coconut milk-based curries, and in China, they can be either deep fried or stir fried then served in a sauce.
My personal favorite is a Sichuan dish where thin slices or slender shreds of young Asian eggplant are stir fried with minced pork and served with what is technically called, “Fish Flavored Sauce,” but which is usually translated into English as “Garlic Sauce.” The eggplant is soft and slippery and bathed in the darkly sweet, hot, tangy sauce, while the minced pork bits are sweet and a bit chewy. Sometimes shreds or slices of fresh water chestnut are used to add crispness and a shattering sugar flavor to the dish, but I’ve most often had it in restaurants with just the eggplant and pork.
Eggplants are madly in season right now–there are piles of them in all shapes, sizes and colors at the Farmer’s Market these days, so I picked up a couple of the little Asian ones to add to some stir fry or another.
It wasn’t until I was digging around in the vegetable drawer to find something for dinner a couple of nights later that I came up with this dish which is a twist on the traditional Sichuan Eggplant with Pork and Garlic Sauce that I love, but seldom find in restaurants. Lacking fresh water chestnuts, I came upon some beautiful green beans and decided to use those to make a crispy counterpoint to the richly soft and unctuous eggplant.
Since the green beans are long and thin, I decided to cut the eggplant into shreds to match the shape of the beans. According to Chinese culinary traditions, matching the shapes of your ingredients is a more aesthetic way to cook, and it ensures that foods cook evenly in the wok. Cutting Asian eggplants into shreds is simple–just cut the fruits into steeply diagonal 1/4″ thick slices so that you are making long ovals, then stack the slices and cut those into 1/4″ wide shreds. Voila–simplicity itself.
Instead of mincing the pork tenderloin (which is what I had), I shredded it as well–by cutting it into slices against the grain, and then cutting each slice into a 1/4″ thick shred.
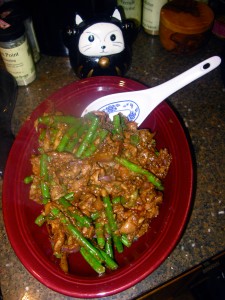
When it came to cooking the dish–I put the eggplant into the wok not long after the pork so it had plenty of time to soak up the flavors of the minced scallion, garlic and ginger that is put into the wok on top of the pork. Basically, I waited until the pork was half cooked–the colors showing were equal parts brown and pink–before tossing in the eggplant, and then stir fried as normal, putting in the blanched green beans when most of the pork shows brown instead of pink. Then, in went the already blended sauce components, and within about a minute and a half, the sauce is reduced and thickened, everything is cooked through and all that is needed is a sprinkling of scallion tops to bring everything to a delicious finish.
How did it taste?
Amazing. Using green beans in a dish of eggplant and pork with garlic sauce may not be traditional, but I don’t care, because it’s damned good. Zak said it was one of the best things I’ve cooked in a long while, and he and I and Kat pretty much ate the entire platter in one sitting.
Mind you, I said almost. There was also enough left over the next morning for a nice cold topping over warmed over rice for breakfast.
And yeah, it makes a great breakfast, too.
Eggplant, Pork and Green Beans with Garlic Sauce
Ingredients:
2 tbsp. rice vinegar
2 tbsp. black rice vinegar
2 tbsp. dark soy sauce
1 tbsp. Shao Hsing wine
2 tbsp. sugar
2 tsp. chili garlic paste
1/4 tsp. sesame oil
1 teaspoon cornstarch
2 tablespoons canola or peanut oil
1/2 pound pork tenderloin, shredded as explained above, then tossed with 1 teaspoon Shao Hsing wine or sherry and 1 tablespoon cornstarch (about 2 cups after cutting)
5 large garlic cloves, minced
4 scallions, white and light green parts only, minced
1″ cube fresh ginger, minced
2 small young Asian eggplants, shredded as directed above–about 2 cups after cutting
1 1/2 cups young green beans, stringed and blanched then drained
dark green tops of the 4 scallions up above, sliced thinly on the diagonal for garnish
Method:
Stir together the first eight ingredients–from the vinegar to the cornstarch–in a small cup or bowl until well combined. Set aside.
Heat wok over a burner on high until a thin ribbon of smoke spirals up from the steel or iron surface. Pour in the canola or peanut oil and heat for another 30-60 seconds, until the oil shimmers and moves lightly over the surface of the wok.
Add the pork in one layer and allow to sit on the surface of the wok, undisturbed, for a minute, or until the meat browns well on the bottom side. As soon as the pork is settled into the wok and arranged so it can brown, sprinkle the minced scallion, garlic and ginger evenly over the meat, then sprinkle the eggplant evenly over that.
Once the meat is well browned on the bottom, stir and fry until most of the meat is brown with only a little bit of pink showing. Some of the aromatic bits will likely stick to the wok, but don’t worry over that much. Add the green beans and stir fry for about ten seconds, then pour in the sauce ingredients, and cook, stirring and scraping until the sauce boils and thickens and everything is fragrant and cooked through.
Stir in the scallion tops, and remove from heat. Scrape into a heated platter and serve immediately with steamed rice.
Zucchini-Carrot Muffins: A Perfect Kindergarten Snack
Surprise! I’m back. Yes. Back. Actually, I’ve been here all this time, just not writing, because I’ve been busy doing other things.
“Like what?” you may ask. Well, you may ask it, and I’ll even answer it.
I’ve been cooking, and I’ve even been good and photographed the bounty of my kitchen, but have not gotten around to recording the recipes because–Kat started kindergarten, so our family has had to adjust our schedule. Seems like I finally got used to the way it worked with her in preschool (after only a year–I’m slow on the uptake sometimes) and BAM! The kid’s in kindergarten, in real school, doing real school things.
And Kat loves kindergarten. She’s already been learning to read–Zak and I have been teaching her, and I’ve been teaching her elementary addition and subtraction, as well as how to count all the way to 100, but now she has continual classroom support on these subjects, and she loves it. LOVES it. She is so happy to go to school in the morning and happy to come home and tell us what she’s been doing. And she’s so much more mature as well.
AND, she’s turning five at the end of the week. Five. It’s been a long, wild five years, let me tell you, but it is so wonderful watching her grow and change so quickly each day of her life. Truly, our whole family is blessed.
AND, Morganna has finally gotten her driver’s license and is now the proud owner of our old Subaru Outback, Big Blue. The process of getting the car fixed up to be safe for her to drive all over creation, and of her getting that license was long and arduous–as a person who was seriously phobic about driving and had PTSD flashbacks to the horrific drivers in my past, I never believed I’d be able to teach someone else to drive. But, I did. I realized as I did so that I’m not afraid of cars anymore, at all. In fact, these days, I’m pretty fearless.
So that’s a great thing, but teaching someone to drive, as well as carting them to and from work and home is a time consuming process.
And then there’s the documentary. It gets its own post, mind you, but Dan and I have been out filming hither and yon, and our team has added a third person, sound technician and foodie Heather, who was one of the originators of the idea of a documentary in the first place. So the three of us are always out and about carting equipment, setting it up, asking questions, falling over from heat prostration, and filming, always filming and it’s just a lot of fun. But also a lot of work.
Especially the behind the scenes work that I get to do, being the producer. I set up filming schedules, keep the clearances and waivers and other paperwork straight and filed, buy equipment, figure out locations and take care whatever physical needs and transportation needs our crew might have–it’s a lot of stuff to keep track of. But, it’s fun, and I have to say–it’s almost as much fun as running a restaurant kitchen. And it uses similar skill sets….but more on that later.
And then, there’s the volunteer work I’ve been doing for the CFI. That’s Community Food Initiatives for those not from here in Athens. In short, it’s a volunteer organization that combats the issue of food security (that is, in a word, hunger) on multiple fronts. More on the CFI in a post of it’s own. It’s too much to explain in a single paragraph, and the work that all of us in the organization is doing is important and worthy of a proper introduction and explanation.
Let it suffice to say that the CFI allows me to feed people who REALLY need good, healthy wholesome food on a larger scale than any other way I’ve done before. And it makes me happy to feed folks who really need it.
But enough about me. I didn’t come here to write about me.
What I want to write about right now are zucchini-carrot muffins.
Why in the world do I want to write about zucchini-carrot muffins? Why? I mean, really, why? Don’t muffins like that just suck? Aren’t they either dry and crumbly and rather cardboardy in texture and listless in flavor, or worse, greenish and goopy-sticky and sickeningly sweet?
Well, yeah, most vegetable-based muffins fall into one or the other of those less than enticing categories, but this recipe is different.
Why is it different?
Because I made it up, that’s why. If readers haven’t figured out by now that I utterly refuse to make and eat or feed others repugnant food, I don’t know what to say.
And why zucchini-carrot muffins? Why not something else?
Well, because I’m in charge of bringing Kat’s class their classroom snack for the next couple of weeks and while I want to make them tasty stuff, I also want to bring them stuff that’s good for them, while I’m at it. It’s part of my mission to educate not only the minds of children while they are at school, but their palates as well.
The first day of my reign as Sultana of Snacks, I brought blueberry mini-muffins that Kat and I made together. From my usual blueberry muffin recipe, though I did modify it a bit–instead of using sour cream, I used all Greek yogurt with an additional 1/8 cup of milk. And I used white whole wheat flour in place of the all purpose flour and whole spelt flour for the white whole wheat flour, and I did replace the melted butter with canola oil and then didn’t coat the top of the muffins with melted butter dipped in sugar. And no white sugar, but only raw sugar.
Let me tell you–those were some good muffins, and by damned if they weren’t also pretty darned good for the wee schoolkids. (They were popular, too. Each kid ate two muffins–which I didn’t expect.)
After two days of fresh fruits and vegetables, I decided it was time to bake again, and this time, Kat asked for zucchini muffins. Yeah, she asked for them by name.
So, zucchini muffins it was to be, though I decided I wanted to add carrots, too, so that the color would be more varied and interesting. I also ended up adding some golden raisins and dried cranberries, because if some vegetables make muffins good, some dried fruits will make it better. Kat did reign me in when it came to the walnuts, though, citing that lots of kids don’t like nuts.
One flavor at a time, said I to myself as I reluctantly set aside the walnuts.
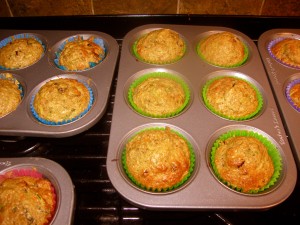
We’ll see how these muffins go over. I baked them in regular sized tins, but they would have made perfectly fine mini muffins as well. Kat sure liked them–she had one for dessert after dinner tonight and pronounced them to be, “Supendous.”
Yeah, she’s got a great vocabulary for a five year old, even if she spoke while she was chewing and left the “t” out of the word. (I choose to believe that lost “t” came about because of that little issue of “talking with the mouth full of muffin.”
At any rate, here are some mighty fine vegetable and fruit-based muffins, perfect for using up the late summer bounty of squash and carrots that are pouring in from a garden near you. These bake up to be moist without being soggy, flavorful without any of the spices dominating, with cute little flecks of dark green and orange suspended in a light brown matrix of spongy cake-like goodness and little chewy amber or garnet colored fruit bits that give a burst of concentrated sweetness that is neither cloying nor insipidly distracting.
These are just damned fine muffins, that’s all there is to it.
Kat’s Zucchini-Carrot Muffins
Ingredients:
2 cups white whole wheat flour or all purpose flour
1 1/2 cups whole spelt or regular whole wheat flour
2 teaspoons baking powder
1/2 teaspoon baking soda
1/2 teaspoon salt
1 teaspoon cinnamon
1/2 teaspoon powdered ginger
1/4 teaspoon cardamom
2 cups coarsely shredded zucchini (DON’T peel it! You’ll lose the pretty green flecks if you do!)
1 cup coarsely shredded carrot (peel that one, though)
1 cup packed light brown sugar
4 large eggs, beaten well
1/2 cup canola or other vegetable oil
1 teaspoon vanilla extract
3 drops orange oil (optional)
1/2 cup buttermilk
3/4 cup golden raisins
1/4 cup dried cranberries
1 cup chopped walnuts or black walnuts (optional)
Method:
Preheat the oven to 325 degrees F. Line muffin pans with paper liners–you will need enough pans to make 24 muffins, though to be honest, you may end up with only 21 muffins, depending on how well you fill the cups.
Whisk together the dry ingredients (from the flours to the cardamom) until they are well combined in one bowl.
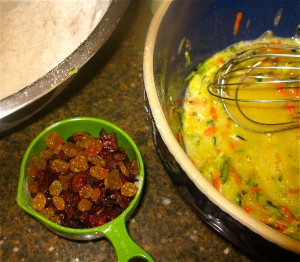
In another bowl, whisk together the vegetables, sugar and eggs until well combined, then stir in the vegetable oil, extract/orange oil, and buttermilk, and whisk lightly. Then stir in the fruits and if you are using them, the nuts.
Sprinkle the dry ingredients into the wet ingredients bowl, and stir until well combined. Don’t beat the batter and don’t even stir more than you absolutely need to–you don’t want to encourage gluten formation here–that makes for tough muffins. And no one wants a tough muffin. No one.
After you have it all mixed together, spoon the batter into the lined muffin cups and bake for between 15-20 minutes. Muffins are done when lightly browned on the top and a toothpick inserted into the center comes out clean. Cool in the pan for ten minutes then remove from pan and finish cooling on a wire rack. Store in an airtight container and serve within 24 hours.
Makes 21-24 muffins.
Leftover Makeover for Refried Beans: Huevos Rancheros
I adore huevos rancheros.
And until breakfast yesterday, I’d never bothered to make them at home.
I’m not sure why except for whatever reason I never had leftover refried beans in the refrigerator at the same time as eggs and freshly made salsa at a time that coincided with a desire to eat huevos rancheros.
Or, perhaps, until yesterday, I had simply been too lazy to bother making them myself since I can go downtown and get a really nice version of the dish made for me at the cosy little locavore haven, Casa Nueva.
I’ll cop to being lazy, so maybe that should just be the answer.
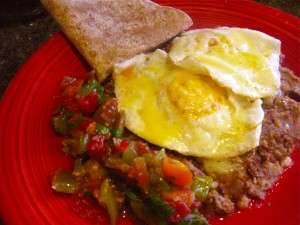
But yesterday, I wanted huevos and couldn’t just haul off and wander downtown because I was waiting for the dishwasher repair guy, so I looked in the fridge and lo and behold! There were refrieds, made the night before from Rancho Gordo’s Eye of the Goat beans, there was Calico Salsa made freshly the night before from heirloom tomatoes we grew in our very own garden, there were fresh local eggs, there was smoked goat cheddar from Integration Acres, and some whole wheat tortillas left over from burritos from the week before.
So, it only made sense to get in front of the stove and make myself a plate of huevos.
For the initiated, huevos rancheros is a dish from the cowboy days, born along the border of Mexico and the American Southwest, and today you can find it in restaurants, truck stops, diners and dives all through that area, all with slight regional variations, especially when it comes to what kind of salsa is featured with the dish. But the basic idea for “eggs, ranch-style” is always the same–one or two corn tortillas are layered with some warm refried beans and cheese, then the plate is put under the broiler to heat it all up nicely and melt the cheese. Two over-easy fried eggs are laid gently atop this bed of leguminous love, a bit of salsa is poured over, cheese is sprinkled again and then under the broiler the plate is put to melt the cheese and warm the salsa.
Then, out it comes to the diner who presumably tucks in gleefully, drinking copious amounts of black coffee which tastes mighty fine alongside the plate of eggs, beans and salsa.
Turns out, if you have the ingredients already prepped up and on hand, making huevos rancheros is a simple matter of warming some stuff up, frying a couple of eggs and melting some cheese, which really, truly, anyone can do in the morning, even if one hasn’t had coffee.
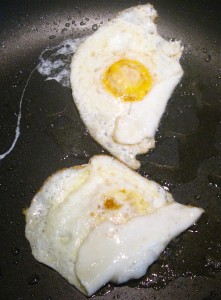
I’d say the trickiest part is frying the eggs. I’m not sure I can really teach someone how to cook over-easy fried eggs online, but I can at least describe the process. But, truly, it just takes practice to get the hang of it. I got good at it working breakfast shift when I was in culinary school. Breakfast shift in a diner or another quick-serve establishment will really teach a person how to cook eggs.
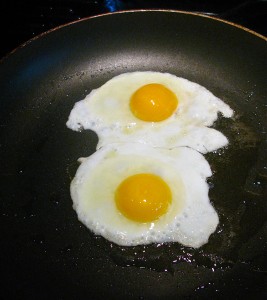
But here’s basically how to go about frying some over-easy eggs–which would be eggs that are fried until the bottom of the egg white is set, then are gently flipped over to set the white on the top. The yolk is only partially set–it is mostly just thickened slightly to a rich, smooth golden liquid. (Over hard eggs are cooked until the yolks are completely set and firm, but not rubbery.)
First, pick a good pan. I use a non-stick pan, but a good, well-seasoned cast iron pan is just as good, if not better. Heat it over medium heat and put a little bit of whatever fat you want to use in it: olive oil is good, butter is better and bacon drippings are the best. THE best. But, if you are watching your weight or are a vegetarian, by all means, use either olive oil or butter. When the oil is dripping, crack your eggs carefully by opening the shell less than an inch from the pan. (Using the freshest eggs possible will not only result in the tastiest eggs but also the most compact egg whites–older egg whites run a lot and spread out over the pan more. Fresher eggs are less likely to result in broken yolks as well.)
Cook the eggs until the whites are set–opaque white–with maybe a little bit of browning on the edges, and just a clear sheen of uncooked white on top. Then, using a thin but sturdy spatula, slide it under an egg, and without lifting the egg clear out of the pan, just gently roll the egg over so that the yolk goes down on the hot surface of the pan, hopefully without breaking the yolk. (The first few times you do this, you’re likely to break the yolk. The egg will still taste good though, so don’t despair and just keep cooking eggs until you get them right.) The closer to the pan you keep the spatula and the egg, the less likely you are to actually break the yolk, and the more gently you roll the egg, the better.
If you are cooking one egg at a time and you have a quick wrist and a strong intestinal fortitude, not to mention the courage of your convictions, you can flip the egg in the air. BUT, from personal experience, I can tell you that it takes about a dozen and a half eggs destroyed to get this advanced technique right and it never works if you’re cooking two eggs or more in the same pan.
Anyway, once you turn the egg over, let it cook for about thirty seconds or so more, just until the white on the bottom is set, and voila! It’s done!
So, that’s how you fry over easy eggs.
The recipe below will teach you what to do with them once you have them. Give making huevos rancheros a try–your taste buds will thank you.
Huevos Rancheros
Ingredients:
(For one serving)
2 fresh corn tortillas
1 cup refried beans
2 tablespoons shredded extra sharp cheddar cheese
1 tablespoon Chile Colorado Sauce or salsa (optional)
2 cooked over easy eggs, fresh from the pan
2 more tablespoons shredded extra sharp cheddar cheese
Fresh salsa to taste
cilantro for garnish (optional)
Method:
Put your two corn tortillas on a serving plate. Spread the beans evenly over them and sprinkle with the cheese. Run under a broiler or microwave until heated through and the cheese is melted. Spread the Chile Colorado or salsa over the beans, then put the eggs on top of that, and sprinkle with the second bit of cheese.
Run under the broiler or microwave for a few seconds, just until the cheese melts and everything is bubbly and nice.
Serve with fresh salsa on the side and sprinkle with minced cilantro. (If you had no fresh corn tortillas, then skip them and spread the beans right on the plate, then serve with a nice freshly steamed whole wheat tortilla for scooping up cheesy-eggy-beany goodness.)
Powered by WordPress. Graphics by Zak Kramer.
Design update by Daniel Trout.
Entries and comments feeds.

