Cook Local, Eat Global
More About Bees: Urban Beekeeping Popularity Soars
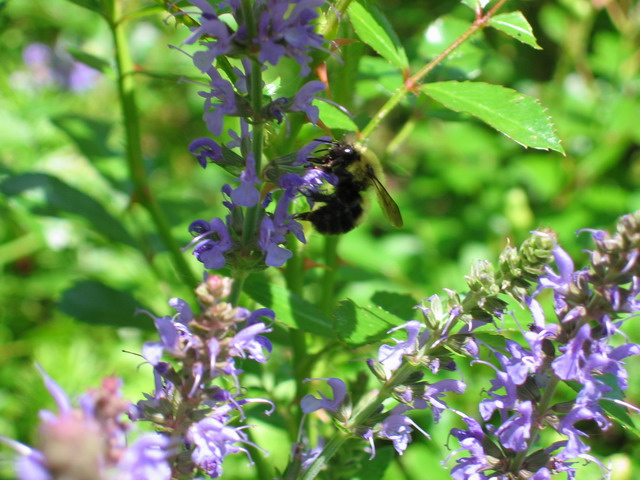
In my last post about bees, I talked about the mysterious issue of Colony Collapse Disorder, a topic which has been hot in the media of late. In that post, I mentioned that hobby beekeeping, especially urban beekeeping, might help boost the population of pollinators, and help assuage fears surrounding CCD.
Well, it seems that urban beekeeping, that is keeping bees in a non-rural setting, whether that is a large city, small town or suburb, is on the rise, if the recent article from Salon is to be believed. In “Hives Among Us,” readers learn that New York City has an ordinance against beekeeping, which is apparently not well enforced, because clandestine beekeepers from the five boroughs are some of the main sources for the article.
New York may have laws against urban beekeeping, but most other large cities do not, which allows hobby apiarists to keep bees and harvest honey in such diverse places as Chicago, Boston and Berkeley.
Interest in urban beekeeping has apparently been rising, and one of the reasons cited is the current trend of seeking locally produced foods for their ecological, economic and nutritional value. Apparently, keeping bees also appeals to urban dwellers’ desire to connect more intimately with their local food chain and with nature in general; giving them a way to help produce some amount of their own food, while learning the art of interdependence with the natural world.
I cannot help but applaud this trend, though I do wonder about the quality of honey produced in this way, particularly in large cities without a great diversity of blooming plants. I wonder how much of the nectar gathered by these urban hives consists of high fructose corn syrup gathered from soda spilled in garbage cans, the gutter and sidewalks of the bee’s home city. While I don’t find that idea particularly appetizing, I have to admit that my romantic heart is thrilled to see urbanites taking part in the art of keeping bees, which has been part of human civilization for thousands of years. (And in that sense, while urban beekeeping may be trendy now, it was practiced in ancient Egypt where beehives were part of some temples.)
Urban beekeeping, in addition to connecting urban dwellers to the natural world and lessening the carbon footprint of their diets, can also help teach valuable life skills to disadvantaged men coming out of prison.
I found out about “Sweet Beginnings,” a suburban Chicago program set up to help ex-convicts get the help they need, often for the first time in their lives, to become productive members of society from a blog on the CBS News website. Going from gangs to bees sounds weird, but it works, and the program has expanded from selling honey at local flea markets to making skin care products and lip balm, all based on beeswax and honey as well. They are now also selling nationally via a new website.
The men involved in the program learn many skills besides the obvious ones relating to beekeeping: reading, writing, accounting, and manufacturing, for example. In addition, they learn general job and life skills which will help them get jobs outside of the Sweet Beginnings program.
Some believe that urban beekeepers might “save the world,” noting that few hobbyist colonies have been hit by CCD, and that keeping bees in urban or suburban environments increase environmental diversity in what can be ecologically sterile places. An article in the Whole Life Times tackles the issue of urban beekeeping with the positive slant that well-maintained hives cause no problems for neighbors, and enhance the city as a whole, even if most people are unaware of the bees’ presence.
Finally, for more information about how to go about urban or suburban beekeeping, check out this article, “Beekeeping in the City” from Bees-Online, an educational website devoted to the art of beekeeping.
I know that as I read more and more about the urban apiarists, I find myself fascinated with the idea of keeping bees in our backyard garden as it grows in diversity and size. We have a huge hillside which we plan to terrace and then plant with many perennials, roses, herbs, flowering vines, vegetables and fruits. We also plan to have a few water features, and the combination of water and a multitude of flowering plants would make our garden a perfect place to site a hive or two. Or three.
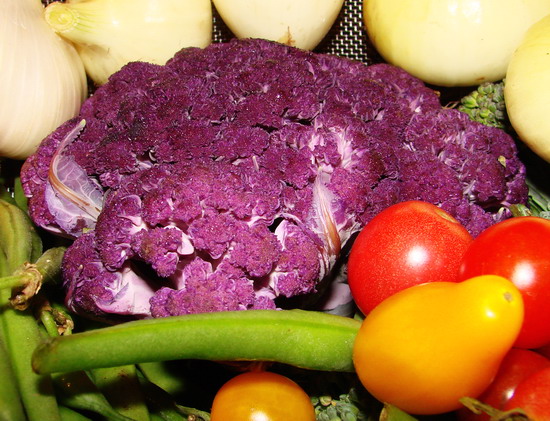
Farmer’s Market Find: Purple Cauliflower
One of the best things about going to the farmer’s market diligently every summer Saturday is the thrill of finding something new. And with so many farmers in Athens growing so many wonderful crops and critters, one is bound to find something new nearly every week.
This week, one of my best finds (you’ll hear about the other later in the week) was this beautiful little head of purple cauliflower. Isn’t it lovely, with the magenta-colored florets shading down to violet and lavender-colored stalks? Of course, I had to snatch it up and carry it home–giving me a purple vegetable to play with is like waving a cute kitten under my nose–I cannot help but cuddle it and play with it.
Cauliflower is a brassica–that is, it is in the same family of green leafies as broccoli, cabbage, collards, turnips, mustard, kale and brussels sprouts. It naturally is endowed with lots of nutritional goodness all on its own because of its family connections: brassicas are full of vitamin C, folic acid, dietary fiber, and sulfur compounds which are beneficial to the immune system.
But, I also knew that purple cauliflower, in addition to being prettier than its blanched white brother vegetable, would also be even more nutritious, thanks to the compounds which give it its strong, unique coloring. Athnocyanins are naturally occurring chemical compounds which give flowers, leaves, stems and roots brilliant red, blue or purple colors. These colors, particularly when present in the flowers and fruits of plants, are used to attract pollinators and animals which eat the fruits, and thus distribute the seeds. These coloring agents, are also known to function in plants as flavanoids–secondary metabolites. In this capacity, anthocyanin, like all flavanoids, happens to be very a very potent anti-oxidant. Even after a plant containing flavanoids such as anthocyanin has been consumed by an animal, or a person, the anti-oxidant properties remain and can be exploited by the body of the creature doing the eating.
In short, purple cauliflower is even better for us to eat than white cauliflower.
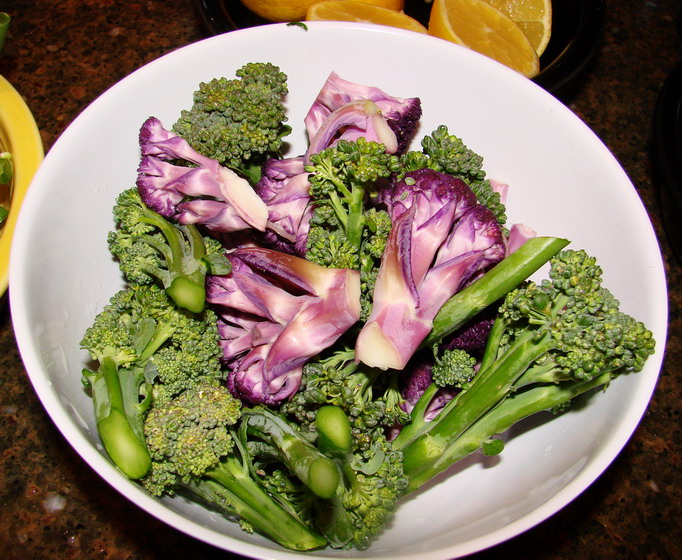
Of course, that meant I had to keep the purple in the vegetable, and that is a bit of a trick, considering that all anthocyanins are water-soluble. That meant, that since I was going to saute the vegetable along with some emerald-shaded broccoli I bought from the same organic farmer, I couldn’t use my normal trick of blanching the cauliflower to partially cook to soften it sufficiently. In my experience, just sauteeing cauliflower often results in a vegetable that is overcooked on the outside, and too crunchy and raw on the inside.
So, I had to go with a different approach.
Knowing as I do that acidic liquids help preserve the brilliant color of anthocyanins, (I learned this years ago from reading Harold McGee’s wonderful tome, On Food and Cooking) and also knowing that the tang of lemon juice is a beautiful foil to the nutty flavor of cauliflower, I determined to use some in the dish. But still, I wanted to pre-cook the cauliflower somewhat to give it a head start on the broccoli, which cooks much faster, when I put them in the pan.
I have had great luck with roasting beets to retain the color, or boiling blue potatoes in their skins without cutting them, but I didn’t really have time to roast the cauliflower, and it really doesn’t have a skin, so neither of those options was satisfactory.
I finally decided to put the florets in a small bowl, add a spare tablespoon of water and microwave them on high until the cauliflower was softened sufficiently to continue with my recipe. I ended up pre-cooking it a total of two minutes, with a very small amount of color lost to the tiny amount of water in the bottom of the bowl.
Some of the red pigment did come out when I added the lemon juice later in the cooking process, but it had the interesting effect of dyeing the onions a brilliant wine-color. It looked amazingly colorful, and it all ended up tasting very well, so I think that the experiment was a success.
So, how did I end up cooking the cauliflower and broccoli?
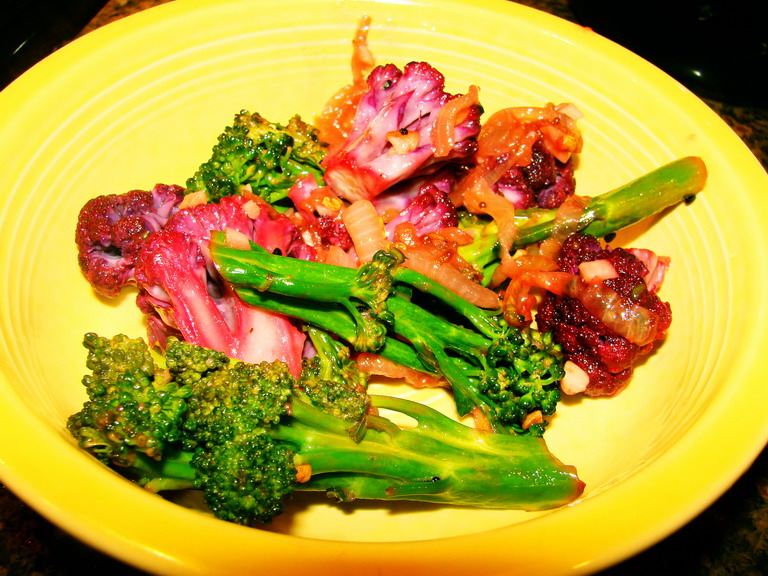
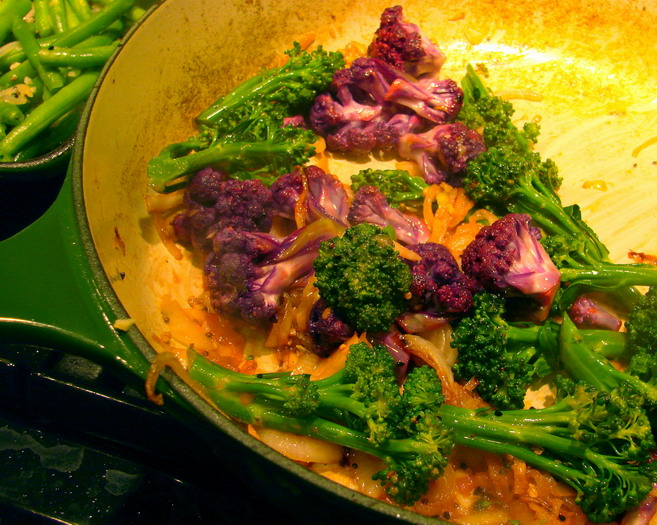
With panch phoron–my new favorite spice mixture, of course. The results were fantastic: the brilliant emerald broccoli and amethyst cauliflower glowed like gemstones in the bowl, and the nutty mixture of toasted spices complemented the rich flavors of the two vegetables. Onions, garlic, salt, ghee and lemon juice rounded out the recipe perfectly, making it a balanced blend of bitter, sweet, tangy, nutty, pungent, and smoky flavors.
You can of course, make this out of white cauliflower, but I think you will miss out on the technicolor beauty of combining vividly green and violet colored vegetables on your plate.
Broccoli and Cauliflower with Panch Phoron
Ingredients:
1/2 pound purple or white cauliflower, cut into small florets
2 tablespoons ghee, butter or canola oil
1 cup thinly sliced yellow onions
1/2 teaspoon salt
2 tablespoons panch phoron
2 tablespoons minced fresh garlic
1/2 pound broccoli florets
3 tablespoons fresh lemon juice
Method:
Place purple cauliflower into a microwave proof bowl, add a tablespoon or two of water, and microwave on high until cauliflower is lightly cooked and tender. Remove from bowl, and allow to drain and dry.
(If you are using white cauliflower, bring a pot of salted water to boil, and plunge florets into the water until it is as tender as you want it. Drain and rinse in cold water to stop cooking, then drain until nearly dry.)
Melt ghee or butter in a heavy-bottomed pan on medium high heat. Add onions, sprinkle with salt and cook, stirring until onions are pale brown. Add panch phoron and garlic and continue cooking until mustard seeds pop, the spices are fragrant and the garlic is golden.
Add the broccoli and drained cauliflower, and cook, stirring, until the broccoli begins to brown slightly. Add lemon juice, and toss to combine with the vegetables. When the broccoli is bright green, the onions turn burgundy and the cauliflower is bright magenta, the dish is finished.
Serve with an Indian meal.
Improvising Summer Spaghetti
The spaghetti that I eat today is not the spaghetti I grew up with.
Like many Americans whose families are not Italian in origin, I grew up primarily with spaghetti that had been overcooked into thick, mushy ropes of pasta, drowned in a fairly bland meat sauce that was almost completely devoid of the flavor of garlic. There were never enough tomatoes in it for my taste, and I remember my parents jazzing their portions up with Frank’s Hot Sauce and cut up green olives. When I tasted from their plates, they saw I liked that spaghetti better, so I was allowed to jazz mine up, too.
And we cut our spaghetti up with a fork and knife to eat it, barbarians that we were.
And you know what? I still liked it.
It was still spaghetti.
Now, when I was lucky, I got to eat spaghetti and meat balls at Aunt Nancy’s house–she could cook the heck out of some tomato sauce and meatballs. I think it had to do with the fact that she grew up cooking among Italians in Providence, Rhode Island, and wasn’t afraid of the flavor and aroma of garlic. Even so, she served her noodles a little overcooked (probably because Uncle George would eat them no other way) and swimming her amazingly delicious deep red sauce redolent with garlic, onions and peppers.
I finally tasted al dente pasta in New York City at the age of twelve, when I visited that grand place with members of a church group. I fell in love all over again. The pasta was toothsome and delicious, and the sauce–it had no tomatoes, nor meat, either–it was made with clams, and wine, garlic and butter and cream, and herbs–it was amazing. There wasn’t a lot of it–just enough to cling to the pasta and flavor it.
What a revelatory experience eating that spaghetti was! It was a wonder–how could they make it taste so good with so little sauce? How long did they cook the pasta? What was the secret of it, how did it work, and why was it all so good?
Of course, I asked the waiter, much to the embarrassment of the other kids and the tour leaders. But I didn’t care. I didn’t care at all. I wanted to -know-. I had to know how and why and oh, it was so wonderful.
The waiter gave me a few tips, of course. He was sweet–told me about al denta pasta (which some of the kids in the group thought was underdone: pah!) and explained that you don’t need to make the pasta drown on the plate in sauce if you make your sauce deeply flavored and thick enough to cling to the pasta.
I kept his words in my heart for years, and when I was out in the world on my own, I started making my own pasta sauces, some more successful than others, that did not necessarily involve lots of meat and lots and lots of tomato puree.
Culinary school refined my sauce-making abilities to the point that I am pretty capable of making a flavorful spaghetti sauce out of very little. Summer is the perfect time to make such sauces, because of the plethora of fresh vegetables and herbs growing all over the landscape, though some really nice ones can be made in the spring and autumn as well.
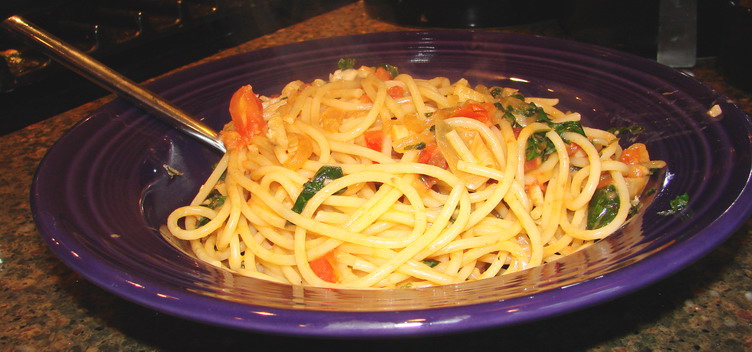
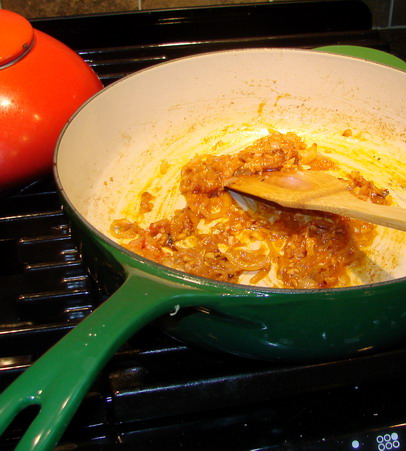
The one pictured above is based on caramelized onions, fresh garlic, a single fresh beefsteak tomato, shredded chard leaves and fresh basil. The liquid components of the sauce are minimal: a quarter cup of cream, a quarter cup of white wine, a tablespoon of tomato paste and a ladleful (about a half cup) of the pasta cooking water. Two tablespoons of olive oil mixed with a tablespoon of butter and a scant quarter teaspoon of anchovy paste and 3/4 cup of shredded Parmesan cheese make up the rest of the ingredients.
The key to the sauce is, surprisingly, the cooking water. I learned that trick from an Italian chef in culinary school. He always made his sauces quite thick in the pan, then used a little bit of the pasta cooking water to thin it down just before dumping the barely cooked pasta in the pan and swirling it in the lightly bubbling sauce. The heat from the sauce finished cooking the pasta, and the starch from the cooking water helped thicken the sauce while the pasta was stirred through it, making it all stick nicely together without clumping.
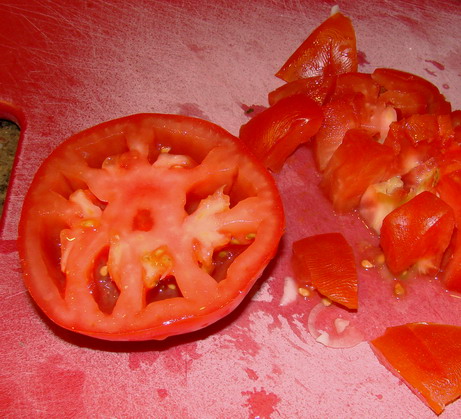
A few more notes before going on to the recipe. This recipe calls for seeding the tomato, but not peeling it. The easiest way to accomplish this is to core the tomato, and then cut it in half, along the equator of the tomato: in other words, don’t cut down across the core where the stem was, but across the fat belly of the fruit. This exposes the seed sacks, and it is then simplicity itself to use your fingers to dig the seeds out of the fruit. Voila–seeded tomato. You can peel the tomato if you wish, but I don’t think it is necessary for this recipe–the tomato bits are not cooked so long that the skin becomes a textural issue.
Also, when it comes to the tomato paste and anchovy paste, I keep in my pantry/refrigerator, these items packed in tubes, like toothpaste. This packaging makes it easy to use small amounts of these ingredients, then seal them up and refrigerate them. They stay fresh for months this way, and the Amore Tomato Paste packed in the tube is delicious, with a very rich tomato flavor without a tinny aftertaste which plagues most canned tomato pastes.
One more thing: you can use this recipe as a sort of template, or springboard, for the creation of your own summery, vegetable-based spaghetti sauce. If you start out with about a cup of sliced onions, about a tablespoon or two of minced garlic, about a half to three-quarters cup of flavored liquids, and then add a cup or two of minced fresh herbs, and whatever vegetables you want, with some tomatoes, and cook quickly on brisk heat, you cannot go wrong. Just cook the sauce base: the onions, garlic and liquids, down to a thick paste, add the vegetables, barely cook them and then add the fresh herbs, the pasta, a swig of the pasta cooking water and the cheese, then toss in the pan–you cannot go wrong. It will result in a delicious, quick and nutritious pasta dish.
It can be a side dish or you can add a good green salad, and maybe a light soup and make it a full meal.
Here at our house, we had it for lunch, and it was filling without being heavy and lumpish around the middle. It beat the heat and yet satisfied both our souls and stomachs. (And yes, Kat liked it, too.)
Spaghetti with Tomato-Chard Sauce
Ingredients:
1 pound of spaghetti
2 tablespoons olive oil
2 tablespoons butter
1 cup thinly sliced fresh onions
1/2 teaspoon sea salt
2-2 1/2 tablespoons fresh garlic
1/4 cup dry white wine
1/4 teaspoon anchovy paste
1 tablespoon tomato paste
1/4 cup heavy cream
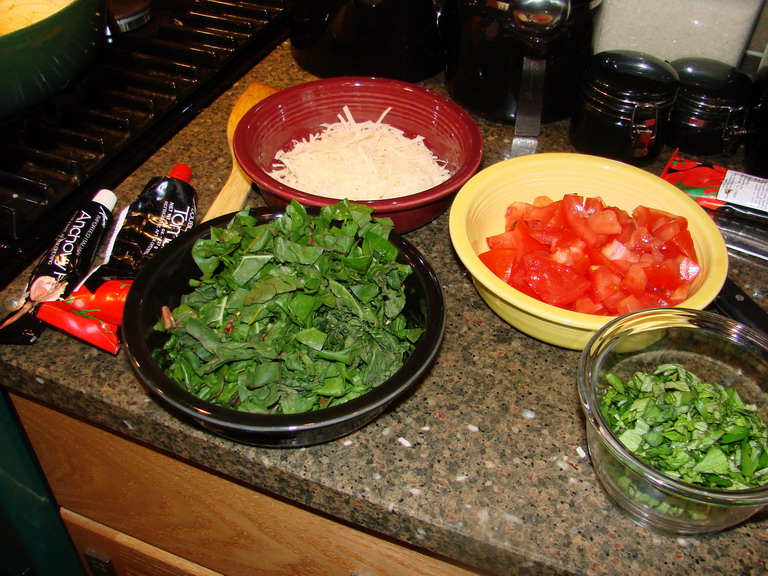
2 cups roughly chopped fresh seeded tomato
1 1/2 cups finely shredded fresh chard leaves (you can use spinach, but all of the spinach is gone here–it is a cool weather crop in Ohio, but chard grows all spring, summer and autumn long, and tastes great)
1 cup packed basil leaves, roughly chopped
1/4-1/2 cup pasta cooking water
3/4 cup freshly shredded Parmesan cheese
Method:
Bring a large pot of salted water to boil and cook spaghetti until it is just barely al dente. (In other words, until it is just slightly underdone to your taste.)
While the spaghetti is cooking, heat oil and butter in a heavy-bottomed braising pan or frying pan on medium heat and add onions. Sprinkle with salt and cook, stirring until they begin to brown. Add garlic and cook, still stirring, until the onions turn a nice rich brown and the garlic is golden and fragrant. Deglaze the pan with white wine, and allow alcohol to cook off.
Stir in anchovy paste, tomato paste and cream, and allow the mixture to cook down to a pinkish brown pasty sauce.
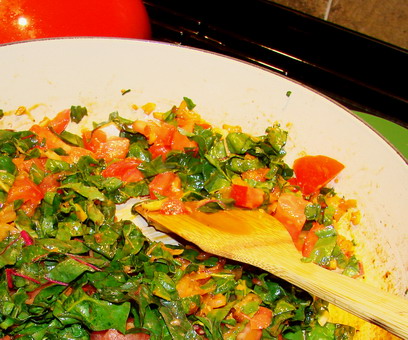
Stir in tomatoes, chard and basil, and allow to cook for about two minutes.
Drain out spaghetti, reserving a few ladlesful of water as stated in recipe.
Add spaghetti to the pan, along with some of the water, using the smaller amount first. Sprinkle the cheese over the top of the pasta, and while still on heat, using tongs (don’t try this with two spoons, use tongs–there is a reason I say to do that! Otherwise, you will make a mess…) mix everything together. It will go together, and the pasta will cook the last little bit in the pan among the sauce and steam.
Ideas for Other Vegetable Combinations:
One could use any leafy green in place of the chard: spinach, collards, kale, turnip or beet greens.
Or, you could use summer squashes cut into thin strips or shreds.
Or, one could use broccoli or broccolini, or rapini, again, cut into small pieces.
Or, slivers of fresh mushrooms. Shiitake mushroom caps cut into slivers would be excellent.
Or, thin slices of sweet and or hot peppers.
The possibilities are nearly endless, if you think about it. See what is fresh at the farmer’s market and play.
Cheesecake For Every Season And Every Reason
Last weekend, when my dear friend Tom, also known as Brother Thomas, visited, he asked if I would make him a strawberry cheesecake.
Of course, I said yes, and used the last of the local strawberries, along with a quantity of very good strawberry jam to do it. I also flavored the batter and topping with rosewater, which makes the strawberries taste, if anything, “strawberrer,” while adding its own distinct and sensual floral aroma.
The cheesecake was, as is usual, a hit.
Then, this weekend is our friend Howie’s birthday, and for his party, I decided to make a cheesecake. One only turns fifty once, you know. But what flavor?
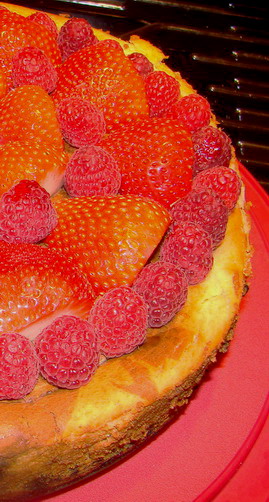
As Howie likes chocolate, it had to be a part of the mixture. I finally settled on a marbled espresso-chocolate and Irish cream cheesecake with an espresso-chocolate crust. And then, to make it pretty, it was topped with fresh raspberries and strawberries.
I like to think of it as the “Irish Mocha Cheesecake;” and as you can see from the illustrations, it was quite pretty indeed.
It also tasted quite amazing.
When I was making Howie’s cheesecake, I realized that I wasn’t using a recipe; nor had I used one for Tom’s strawberry cheesecake, nor Dan’s Chocolate Raspberry cheesecake.
I just adapted the basic cheesecake recipe I have used for years by adding different flavorings and crusts, and using different proportions of egg yolk and the like.
Which led me to think that instead of giving every cheesecake variant as I develop it, I should give the basic recipe, which is essentially fool-proof and let everyone else come up with great combinations of their own. And that way, when I write about cheesecakes ever afterward, I can refer back to the basic recipe as needed. 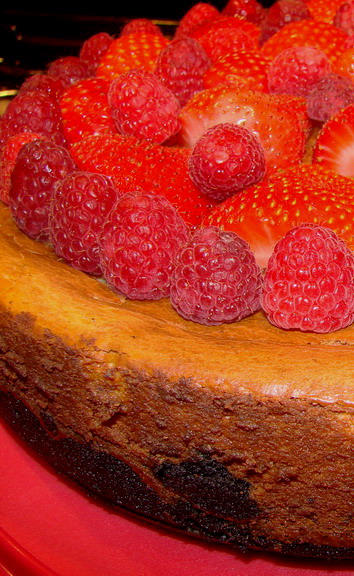
First things first: I did not develop the basic recipe myself.
It comes from a wonderful cookbook called Rosie’s All-Butter Fresh Cream Sugar-Packed Baking Book, which was written by the owner of the rightly popular Boston bakery, Rosie’s, Judy Rosenberg. Rosenberg is a baker after my own heart: she knows that the treats she makes are not supposed to be eaten every day, so she doesn’t bother with making them low-fat or otherwise healthy. Treats are just that, treats, and they are not meant to be everyday indulgences, so she loads her recipes with all the evil fattening stuff that a sweet tooth could want.
You have got to love a woman like that.
Anyway, her cheesecake recipe is based upon one she remembers from her childhood, at Reuben’s Deli, and I have been using this recipe, in about a bazillion different variations since I first got her book when it came out in 1991. It is virtually a no-fail recipe, it is quite simple, and it is well worth making it a part of your own dessert repertoire.
So, without further ado, here is my version of Rosenberg’s cheesecake: stripped down to its essentials so that it can be used as a formula or naked canvas upon which the baker can paint her own flavorings and additions. And at the end, I will give the changes one needs to make to make Tom’s Strawberry Cheesecake (which alas, I did not photograph before it was eaten) and the Irish Mocha Cheesecake.
This formula is the single best cheesecake I have ever eaten–it is creamy, smooth and rich without being dense or heavy on the palate. As Morganna, my dear daughter says, it is by my cheesecakes that one can tell I am of German descent: I make cheesecakes with which one could take over the world, one happy tongue at a time.
If I must have a secret weapon, let it be cheesecakes, I say.
Universal Cheesecake Formula
Ingredients:
1 1/2 cups crumbs (vanilla wafers, graham crackers, shortbread cookies, chocolate wafers, or zwieback crumbs
1/2 cup finely ground nuts (optional–use almonds, hazelnuts, walnuts, pecans–whatever you like, though I prefer almonds)
1 tablespoon sugar (optional–for the shortbread, vanilla wafers, and chocolate wafers it is not necessary–I seldom use it at all, but when I do, I use raw sugar)
1/4-1 teaspoon dry spice or flavoring (optional–for graham cracker, dried ginger, cardamom and cinnamon, for chocolate wafers, espresso powder rules)
6-8 tablespoons butter, melted (This depends on how dry the crumbs you are using for the crust are. Start with six tablespoons. and if the crumbs are to dry to come together into a crust, add more butter 1/2 tablepoon at a time)
3 pounds cream cheese, softened
1 1/2 cups sugar (for pale, non-chocolate cheesecakes, I love the flavor of raw sugar)
1 teaspoon-2 tablespoons flavoring (vanilla paste, extracts, liquor, citrus zest and juice, rosewater, espresso powder dissolved in heavy cream)
3 whole large eggs
2-3 egg yolks (for chocolate cheesecakes, I use 3–all others get 2)
3-6 ounces high quality (I use Sharffen-Berger and Lindt)bittersweet chocolate, finely chopped (optional–for chocolate or marbled cheesecakes)
Method:
Preheat oven to 375 degrees F.
Place crumbs, optional sugar and nuts and any flavorings to be used in the crust into the bowl of a food processor. (I also use the processor to make the crumbs, by the way, so they are usually already in the bowl.) Start the processor and as it is running, drizzle the melted butter through the feed tube. Allow machine to mix thoroughly until the texture of damp sand is accomplished. (Start with smallest amount of butter, then if the crumbs are still too dry to hold together like damp sand, add more melted butter, a half tablespoon at a time until it holds.)
Dump crust ingredients from processor bowl into the center of a non-stick 10 inch springform pan. Pat the crumbs in an even layer on the bottom of the pan and about a third of the way up the sides of the pan. Don’t worry if the top edge is a little ragged. It won’t matter.
Bake in the preheated oven for fifteen minutes (ten if you have a convection oven), then remove from the oven and allow to cool thoroughly. Turn the oven temperature down to 300 degrees and put a pan of water in the bottom of the oven. This creates a moist, steamy environment for the cheesecake to bake in, without having to bake it -in- a water bath.
Beat together the cream cheese and sugar in a heavy-duty mixer until they are thoroughly combined and are fluffy. Add any flavorings, extracts, liquors or citrus zest and juice at this time, and beat well to combine.
Whisk together the eggs and egg yolks until they are thoroughly combined and lighten in color somewhat. Add to cheese batter and beat well to combine. (This also incorporates some air into the batter.)
If you are using chocolate, melt it carefully, either over a boiling water bath on the stove, or in the microwave, at ten second intervals, stirring between each interval. Do not allow water to touch the chocolate–this will cause it to seize up and solidify instantly in a very ugly and nasty way.
After the chocolate is thoroughly melted–and I mean no lumps–melted all the way–scrape it into the cheesecake batter and beat to combine. Remember, if you are using chocolate, to add that third egg yolk before you add the chocolate. (For an all-chocolate batter, use the larger amount of chocolate–for a marbled batter, use the smaller amount, and mix it into one third of the cheesecake batter, leaving the other two thirds plain.)
Scrape cheesecake batter into the prepared, cooled pan over the crust, and smooth the top so it is even. Place into the center rack of the 300 degree preheated oven and bake for one hour and fifteen minutes. (Bake for fifty minutes to an hour if you have a convection oven.)
Remove from oven when done–the cake will be set around the edges, and will be somewhat jiggly in the middle. Do not worry–as it cools on a wire rack on the counter, the residual heat of the cake will continue to bake the middle. By the time it is at room temperature, it will be completely set.
Allow to cool to room temperature, then cover tightly with foil, and still in the pan, refrigerate for at least ten hours or until completely cold.
To remove from the pan and serve, run a thin icing spatula or knife gently around the outside of the springform pan to loosen the cake from the pan. Unlock the spring, and loosen the sides of the pan away from the cake, and lift away.
Decorate and top as you choose and serve proudly.
It serves at least sixteen people, up to twenty or so, depending on how thinly you slice the cake.
Variations:
In making these variations, use the Universal Cheesecake Recipe above, and plug in the ingredients outlined in these little recipelets below in the places where they belong in the formula. It is very simple, and the results are very satisfying.
Brother Thomas’ Strawberry Cheesecake
Ingredients:
1 1/2 cups graham cracker crumbs
1 teaspoon raw sugar
1/4 teaspoon ground dried ginger
1/8 teaspoon ground cinnamon
1/8 teaspoon ground cardamom
1 tablespoon lemon juice
1 tablespoon grated or minced lemon zest
1 1/2 cups high quality strawberry jam or preserves
2 tablespoons rosewater
1 quart fresh strawberries
Method:
Following the Universal Cheesecake Formula, make the crust out of the graham crackers, sugar and spices.
Add to the batter recipe the lemon juice and zest at the point indicated in the universal recipe.
In a separate, microwave safe bowl, heat up the strawberry jam or preserves until it melts slightly. Mix in rosewater. Set aside to cool somewhat. Separate out 1/3 of the jam mixture and set aside.
When batter is complete, scrape half of it into the prepared pan with the baked crust. Spoon dollops of the jam mixture that was not set aside 9use half of it) on top of the batter, and using a chopstick or the handle of a teaspoon, swirl to create a marble effect. Scrape the rest of the batter on top, and repeat with the remaining jam (not the stuff that was set aside–leave that alone for now!). Dollops on top of the batter, swirled into a marble pattern with a chopstick or teaspoon handle.
Bake cake as directed.
Wash your strawberries and allow to dry completely. Cut off the green stems and leaflets with a straight cut across the top of the berry.
When the cake is completely cool, just before serving, heat up the set aside jam and rosewater mixture slightly, so that it can be spread over the top of the cake, in the natural well created by the higher-rising edge and the slightly sunken center. Cover the jam with the whole berries, placed pointed end up.
Serve immediately.
Irish Mocha Cheesecake
Ingredients:
1 1/2 cups chocolate wafer cookie crumbs
1 tablespoon espresso powder
1 teaspoon vanilla bean paste
3 tablespoons Bailey’s or Carolan’s Irish Cream liquor
1 egg yolk
3.5 ounces Lindt bittersweet chocolate, chopped finely
1 tablespoon heavy cream, warmed
1 tablespoon espresso powder
fresh strawberries and raspberries as needed to cover top of cake
Method:
Use the chocolate wafer cookie crumbs and espresso powder to make crust as directed in the Universal Cheesecake Recipe.
Mix into the batter the vanilla bean paste and Irish cream liquor where directed in the recipe. Add the extra egg yolk with the rest of the eggs and yolks as directed in the recipe.
Remove 1/3 of finished cheesecake batter from bowl and set aside.
Melt the chocolate carefully as directed in the recipe.
Dissolve the espresso powder into the cream and mix into the melted chocolate. Beat chocolate mixture into the 1/3 of the cheesecake batter until completely combined.
Scrape half of the plain batter into the cheesecake pan, and add dollops of the chocolate batter (use half the chocolate), and swirl with a spoon or chopstick to combine into a marble pattern. Repeat a second layer, using the rest of the batter.
Bake as directed.
When the cake is completely cool, cover the top completely with fresh raspberries and halved strawberries. Serve immediately.
The Universal Cheesecake Formula is also the recipe I adapted to make Pomegranate Cheesecake and Chocolate Raspberry Cheesecake. I am sure that I will come up with other variations as the days go by and more people ask me to bake a cheesecake for some occasion or another.
Cooking For Kat: Breaking the Baby Food Rules

Yesterday, the time I would have taken up with writing, I was in the kitchen, busily whipping up a whopping large amount of baby foods for Kat. Our supply of little frozen cubes of baby meals had dwindled down to nearly nothing (we were down to two cubes of dal and one of blueberry puree), so it was time to spend an afternoon bustling and cooking down fruits, vegetables, herbs and spices into purees that Kat can have for her breakfasts, lunches and dinners.
Ever since we got the green light from her pediatrician to start her on three solid meals a day, we have been sitting her down, often while we ourselves are having a meal, and feeding her some of her own pureed foods, especially prepared for her by her doting mother, using fresh or frozen organic ingredients, local if possible. Most of these foods were made according to the rules of homemade baby food (I bet you didn’t know that there were rules, but there are) and with the exception of the coconut milk curry and dal, contained little in the way of spices or seasoning.
However, with each passing day, Kat grows more interested in what Zak, Morganna and myself eat and less in what is before her on the table. Which means that one of the other of us has slipped her a taste of our own food, well mashed or minced, to find that she likes nearly everything except bland food.
This has slowly led me to one-by-one, ditch the rules of homemade baby food and go with what Kat likes. within reason.
One of the first rules of homemade baby food and one of the first ones to go is the injunction not to feed babies highly spiced or seasoned food.
Unfortunately, Kat -loves- highly seasoned food, so much that she ended up eating the chili Morganna, Zak and I were eating for dinner last night, though I did run an immersion blender through it first. What was in my chili? Three kinds of beans, beef, tomatoes, corn, onions, garlic, pepper and spices, including some chili powder. The entire time I was cooking it, she was looking on, and wiggling in her highchair, begging to taste everything that went in it. We sat down to eat and she begged for food. So, I gave her a tiny taste off of my spoon, and she reached for more.
So, I pureed some and gave it to her. And she was so thrilled with it.
I ended up freezing some of it to feed her later. Most authors recommend that if you feed a baby food from your own dinner, you take theirs out before you add any seasoning or even salt to the food, and grind it up. Well, yeah. Um, that is not really happening here.
And the foods I am supposed to avoid feeding her. I am not doing so well with those. The list of foods to avoid are any raw vegetables or fruits (bananas are apparently an exception to this injunction against raw fruits) , and highly allergenic foods such as seafood, egg whites, wheat, uncultured dairy, citrus, wheat, honey, chocolate, strawberries, (berries of any kind other than blueberries and cranberries, actually are forbidden) tree nuts and peanuts. Oh, and root and leafy vegetables that contain high levels of nitrites, such as kale, collards, spinach, chard, broccoli, beets and turnips.
I’ve been giving her small bits of raw tomato for a month now. And guacamole is of course, uncooked–and it has lime juice in it. And I gave her a taste of strawberries two weeks ago, and she hasn’t reacted badly. We were eating them raw, her father and I, and she begged so piteously. She also likes honeydew melon, which of course, I did not cook. And, I have given her spinach, which she loves, and chard and broccoli, though not in large quantities.
I asked Kat’s pediatrician about these issues, and she said that so long as she is showing no sign of allergies, not to worry, and to completely not worry about the nitrites issue since I am feeding Kat organic vegetables. The only foods which I am still to consider forbidden are uncultured dairy, tree and peanuts, seafood, and egg whites. I still won’t give her chocolate, since I was allergic to it in childhood. I give her cheeses, but none of them that have mold or are from raw milk–I am allergic to moldy cheeses myself.
And I do avoid honey, and in fact, most sweeteners other than fruit puree or juice. (And she still will not drink fruit juices. She hates them, and will drink water instead.)
She has even had wheat, in the form of my simple summer pasta, which she insisted upon eating with us, even though it was quite spicy and had citrus in it. (We all assumed that the flavors would be too strong–but we were wrong. She loved it.)
Oh, and she had a morsel of freshly baked whole wheat bread with a tiny bit of butter on it. And–surprise–she was quite fond of that as well.
So, I am trying to be a good mother.
And I am, in most ways a very good mother. As much as she wants it and begs for it, I won’t give her coffee, nor cookies, nor ice cream, though frozen yogurt is a treat now and again. I am certainly feeding Kat a varied diet of all fresh, whole foods, along with breast milk produced by my varied, whole food diet.
She is healthy and growing well, and is now working hard at learning to walk. Her little legs are very strong and sturdy, and I think that if there were problems with her nutrition, she wouldn’t have the strength that she has.
And she has started to take the spoon from me to feed herself. With the spoon, not her hands.
I was thinking that perhaps I was too permissive in giving her tastes of nearly everything, but now that I look at her and hear from her doctor, I think we are doing fine. I mean, when her grandparents visited a few weeks ago, part of their main entertainment was watching all of the foods that Kat would eat with glee and great gusto.
It is nice to watch a baby grow up on a whole foods diet, healthy and happy, and see that there is nothing kooky or weird about feeding a child real food after all.

Categories:
- Admin (rss) (55)
- Blogs and Blogging (rss) (81)
- Book Reviews: Cookbooks (rss) (43)
- Book Reviews: Non-Cookbook Food Books (rss) (38)
- Cats and Cat Blogging (rss) (47)
- Chinese Cooking Lessons (rss) (32)
- Culinary School Stories (rss) (18)
- Dairy Pruducts: Cultured and Barbaric (rss) (4)
- Documentary Filmmaking (rss) (1)
- Essays, Rants and Reflections (rss) (260)
- Fighting Hunger (rss) (12)
- Food and Kids (rss) (45)
- Food in the News (rss) (126)
- Food Media (rss) (98)
- Food Preservation (rss) (18)
- Food Safety (rss) (45)
- Gardening (rss) (30)
- Herbs and Herb Blogging (rss) (20)
- Holidays (rss) (50)
- Kat Blogging (rss) (22)
- Kitchen Science (rss) (36)
- Leftover Makeover (rss) (8)
- Life, the Universe and Everything (rss) (131)
- Local and Sustainable (rss) (227)
- Local Athens Food and Foodies (rss) (42)
- Meatless Mondays (rss) (32)
- Menu For Hope (rss) (5)
- Nutrition, Diet and Health (rss) (84)
- On The Farm (rss) (8)
- Recipes: Almost Vegetarian, Vegetarian and Vegan (rss) (294)
- Recipes: American Regional (rss) (37)
- Recipes: Appalachian Hillbilly (rss) (33)
- Recipes: Bread, Pasta, Grains (rss) (95)
- Recipes: Canning and Preserving (rss) (8)
- Recipes: Chinese (rss) (123)
- Recipes: Comfort Food (rss) (120)
- Recipes: Cookies (rss) (16)
- Recipes: Desserts (rss) (48)
- Recipes: French (rss) (25)
- Recipes: Fruits and Vegetables (rss) (302)
- Recipes: Greek, North African and Middle Eastern (rss) (31)
- Recipes: Indian (rss) (137)
- Recipes: Italian (rss) (42)
- Recipes: Japanese (rss) (7)
- Recipes: Jewish (rss) (4)
- Recipes: Korean (rss) (6)
- Recipes: Meat, Poultry and Fish (rss) (220)
- Recipes: Mexican/Native American/ Latin American/Caribb (rss) (27)
- Recipes: Original (rss) (108)
- Recipes: Thai (rss) (27)
- Recipes: Tofu (rss) (17)
- Recipes: US Regional (rss) (16)
- Recipes: Vietnamese (rss) (8)
- Restaurant Stories (rss) (28)
- Sewing, Quilting, Arts and Crafts (rss) (16)
- Simple Chinese Recipes (rss) (30)
- Slow Food and Heritage Foods (rss) (10)
- Spice Blogging (rss) (44)
- The Chinese Cookbook Project (rss) (14)
- The Chinese Pantry (rss) (39)
- The Documentary (rss) (2)
- The Kitchen Saga (rss) (17)
- The Locavore's Bookshelf (rss) (15)
- The Unsung Adventures of The Culinary Nerd (rss) (6)
- Tools and Toys (rss) (35)
- Uncategorized (rss) (10)
- With a Side of Politics (rss) (48)
Archives:
- August 2012 (9)
- July 2012 (12)
- September 2011 (3)
- August 2011 (7)
- July 2011 (8)
- June 2011 (16)
- May 2011 (17)
- April 2011 (11)
- December 2010 (9)
- November 2010 (5)
- February 2010 (1)
- December 2009 (5)
- November 2009 (7)
- October 2009 (10)
- September 2009 (16)
- August 2009 (14)
- July 2009 (14)
- June 2009 (7)
- May 2009 (17)
- April 2009 (10)
- March 2009 (25)
- February 2009 (13)
- January 2009 (10)
- December 2008 (5)
- November 2008 (5)
- October 2008 (6)
- September 2008 (13)
- August 2008 (8)
- July 2008 (11)
- June 2008 (18)
- May 2008 (13)
- April 2008 (14)
- March 2008 (16)
- February 2008 (17)
- January 2008 (19)
- December 2007 (25)
- November 2007 (18)
- October 2007 (24)
- September 2007 (16)
- August 2007 (15)
- July 2007 (15)
- June 2007 (10)
- May 2007 (14)
- April 2007 (16)
- March 2007 (17)
- February 2007 (20)
- January 2007 (13)
- November 2006 (1)
- October 2006 (8)
- September 2006 (14)
- August 2006 (25)
- July 2006 (30)
- June 2006 (28)
- May 2006 (34)
- April 2006 (29)
- March 2006 (24)
- February 2006 (30)
- January 2006 (38)
- December 2005 (40)
- November 2005 (37)
- October 2005 (32)
- September 2005 (25)
- August 2005 (30)
- July 2005 (28)
- June 2005 (21)
- May 2005 (8)
- April 2005 (22)
- March 2005 (17)
- February 2005 (29)
- January 2005 (10)
Search Site:
Links:
- Lily’s Wai Sek Hong
- 101 Cookbooks
- A cat in the kitchen
- A Veggie Venture
- Accidental Hedonist
- Cha Xiu Bao
- chez pim
- Chocolate & Zucchini
- Chopstick Cinema
- Chowhound.com
- Chubby Hubby
- Cook sister!
- Cooking with Amy
- da*xiang
- Eat Local Challenge
- Eating Liberally
- Ecocentric
- Eggbeater
- Epicurious
- Farmgirl Fare
- Fatfree Vegan
- Foodgoat
- ForkandBottle.com
- Green Olive Tree
- Hooked on Heat
- Jaden’s Steamy Kitchen
- Kalyn’s Kitchen
- Lucullian delights
- Mahanandi
- Matt Bites
- MeatHenge
- mmm-yoso!!!
- New York Times – Dining & Wine
- Pizza Goon
- Rasa Malaysia
- Ruhlman
- Sailu's Kitchen
- Serious Eats
- SF Gate: Food & Dining
- Simply Recipes
- Soul Fusion Kitchen
- Tastespotting
- The Amateur Gourmet
- The Cleaner Plate Club
- The Food Section
- The Grub Report
- thecookscottage
- U.S. Food Policy
- Wandering Chopsticks
- Washington Post Food and Dining
- Wasted Food
Meta:

Powered by WordPress. Graphics by Zak Kramer.
Design update by Daniel Trout.
Entries and comments feeds.