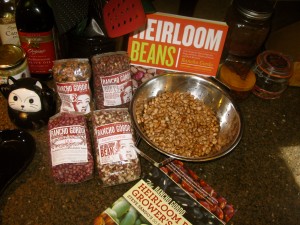
Rancho Gordo’s Heirloom Beans
As we all know around here, I love beans. (They are the magical fruit, right?)
When I met Zak, he told me he didn’t like beans. I was like, “What?” But then, I quickly understood–he had never had them except out of a can, and if there is something that might well make someone dislike beans, it’s those mushy, flavorless critters that come out of cans masquerading as beans. It doesn’t matter what kind of bean they say they are, or what color they are, most of them taste the same–blah. Kinda mealy, kinda mushy, very yucky.
So, I proceeded to cook him a pot of proper pinto beans, made the old hillbilly way with a ham hock (I can feel the vegetarians wincing, but well, beans taste mighty good that way and I wanted to make sure to hook him before I went all vegetarian on him) a bay leaf, an onion and a garlic clove and lots of water which turns into a delicious bean broth that was always my favorite part of beans when I was a kid. Mother thought I was weird, but I liked to drink a cup of it right out of the pot, I liked it so well. (I did the same with the liquid kale is simmered in, too–she told my doctor about it and he said, “Let her do it! That’s where most of the vitamins have escaped to!)
Well, needless to say, Zak was converted, and we’ve had lots of beans in our pantry ever since.
Recently, I’ve been keeping Athens very own Shagbark Seed & Mill Company’s black turtle beans in my pantry and have been using them for all sorts of purposes–as a plain old pot of beans, drained and used to top nachos, in salsas, in tacos and in enchiladas. And they are mighty good, no, not just good, but delicious, with a nice chew to the skins with creamy, sweet interiors. And they make fine broth.
And I’ve heard tell that Michelle and Brandon are offering pinto beans this fall after they get harvested–glory hallelujah, and praise be! I’m waiting impatiently to taste those, because when I was growing up, pinto beans and cornbread were a big favorite, especially in the late fall or winter. I never tired of them, even when we ate them a whole lot when Dad was laid off for a year and we went from “somewhat impoverished” to “downright poor.” Even eating them several times a week didn’t dampen my enthusiasm for them. Pintos are just that good, and I cannot wait to taste ones fresh from the field, because I know they’ll be better than the ones from the store which could have been hanging around for who knows how long.
BUT, you know, a reader named Laughingrat commented when I wrote about Shagbark’s black beans and clued me into a company that grows and sells heirloom varieties of dried beans out in California, called Rancho Gordo.
And you know how I am. I looked at their website, and saw all the beautiful beans in all their glorious colors: yellow, red, purple, black, piebald black and white or brown and white, streaked, spotted and speckled, pink, and celedon green–and of course, I was smitten. I’m a sucker for colors, and even though I knew darned good and well that when you cook dried beans most of those luscious pigments melt away and you end up with beans in some shade of creamy beige or brown, I couldn’t help it–I had to know if these beans were indeed any more special than the ones that came from the grocery store.
Steve Sando, the owner of Rancho Gordo and the Guru of Legumes, writes eloquent descriptions of the flavors and textures of the different legumes he offers in his online catalog and at his retail outlet in Napa, as well as in San Francisco, and his words haunted me. Because, I just had to know if his beans were just as good as the beans grown here in Athens.
So, I ordered a couple of pound packages for myself and a full dozen packages as a Father’s Day gift for Zak’s dad, Karl. (Karl is a bean aficionado, just like me.)
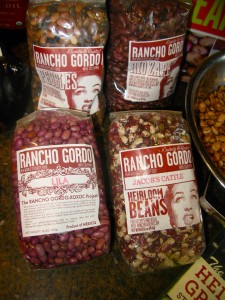
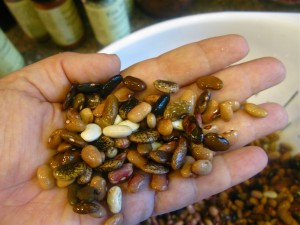
And, I finally got around to testing out three of the varieties from Rancho Gordo: “Pebbles,” which is a fascinating bean in that from the same plant come beans of all different shades of brown, pinkish beige, black and yellow, “Yellow Indian Woman,” which is widely grown among the Native American tribes in the northern plains (though it was originally brought to Montana by a Swedish family) and “Eye of the Goat,” which looks like a very fat, rounded, glossy pinto bean.
And here’s what I found out–Sando’s beans from Rancho Gordo have the same qualities of freshness that I found in Shagbark’s beans. They cook slightly faster than grocery store dried beans, probably because they’ve not been sitting in a warehouse for years on end. They also have more flavor–a LOT more flavor–and each type has a different character. And, finally–their textures are more varied than most grocery store beans–each type of bean has a distinctive texture–just as the black beans from Shagbark had tougher skins, but very creamy interiors, which led to them being paradoxically both slightly chewy and yet melting in the mouth.
I cooked all three types the same–in a pot with a bay leaf, a small amount of smoked pork (a small hunk of ham hock), a small whole onion and a whole clove of garlic. Then, I used each one in several ways to see how versatile they were in the context of different recipes.
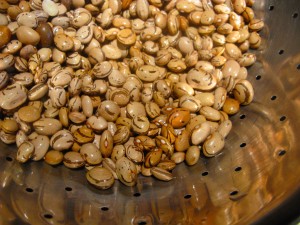
The first one I cooked was “Pebbles.” You know I had to see what they were like, because they really do look like a bunch of river-polished stones. If you drilled holes in these beans and strung them up, they’d look like a necklace of agate beads–they really are that pretty, as you can see from the photo. (Maybe I should attempt to string some of them into a bracelet, if not a necklace.)
I used the cooked, drained beans to top nachos made with Shagbark’s amazing corn tortilla chips and some really lovely aged cheddar, and Kat and Zak and I loved them. Kat proclaimed them the “bestest bean nachos ever,” and Zak said that the beans had a slightly sweet flavor that was interesting.
Also, I noticed that while the differences between the colors of the cooked beans was not as startling as with the raw beans, they still showed subtle variations that made them look pretty neat on the plate.
I also ended up using these in a taco filling and as the filling to some vegetarian enchiladas that included grilled corn cut from the cobs and summer squash, and even in those contexts, the beans retained their sweet flavor and textural character.
The next beans I cooked were the “Yellow Indian Woman” beans, but I neglected to take photographs of them, either before or after they were cooked. They start out as ovoid brownish yellow beans and cook up to a pale pinkish brown. Their skins are somewhat tough so they retain their shape very well, even when cooked in a pressure cooker. Their flavor is distinctly earthy and sweet, and when I made them into refried beans, they had a silky, creamy texture that Kat and I adored.
Zak liked them, too, but he prefers the beans I cooked today to use in a refried bean dip to go with my salsa for a potluck at Kat’s preschool.
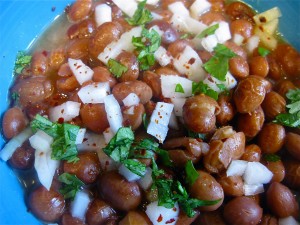
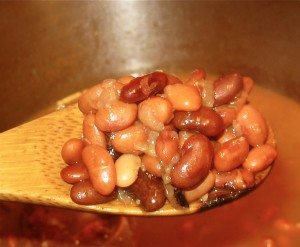
These beauties are known as “Ojo de Cabra,” or, “Eye of the Goat,” and at first glance they don’t look all that special. I mean, yeah, they’re pretty, but really they look like really pinto beans that went on an eating binge and are about to burst their skins, they’ve gained so much weight from all their gobbling.
But they don’t taste like pintos. They have a very fresh, sweet flavor with a hint of mushroomy depth. Steve Sando says likes to cook them simply and then serve them with some grated raw onion and a squeeze of lime juice and a bit of salt. You can see my version pictured in the blue bowl near the top of this post–I diced the onions finely instead of grating them, added minced cilantro along with the salt and a sprinkle of Aleppo pepper flakes just before the lime juice squeeze.
And you know what–that makes a fine bowl of beans. And it showcases the very meaty texture of the Goat Beans as I’ve come to call them. That’s what I ate for lunch today.
But for the potluck tonight, I mashed the beans and fried them with fresh onion and garlic in a bit of bacon fat melted with olive oil, and Zak said he absolutely loved the fuller, deeper texture of these beans to the creaminess of the “Yellow Indian Woman” beans. He said that the texture was firmer and a bit drier, but it made the beans taste somehow nutty in addition to just plain good.
So now we have a new favorite refried bean bean.
That is, until Shagbark’s pintos come in.
Then, we’ll see whose beans come out on top.
Until then, let it be known that I highly approve of the heirloom beans Sando is offering through Rancho Gordo–and while I’m at it–his two books, The Rancho Gordo Heirloom Bean Grower’s Guide: Steve Sando’s 50 Favorite Varieties and Heirloom Beans: Great Recipes for Dips and Spreads, Soups and Stews, Salads and Salsas, and Much More from Rancho Gordo are downright awesome, too.
Both are filled, cover to cover, with bean lore, cultivation information, recipes, and description of the individual characteristics and flavors of a whole array of heirloom beans, and are equally filled to the brim with Sando’s very infectious leguminous enthusiasm. Both books are well worth checking out, though the second book is more a cookbook that is geared toward foodies, while the first has essential bean cultivation information, as well as descriptions of the beans, their histories and a few recipes featuring them that aren’t included in the first second book.
So there we are–check out Rancho Gordo and see what you think of their heirloom beans–because they really are just that good.
Now, I’m going to stop writing and wait impatiently for Shagbark’s pinto beans to be ready to harvest…..
Meatless Monday: Ratatouille
One of my goals in writing this blog has always been to educate anyone I can reach with my words on how to cook delicious food in their own kitchens, food that is as good or better than what can be found in restaurants. I personally believe that cooking whole, fresh foods in our kitchens can help reverse the epidemics of obesity, type 2 diabetes, and heart disease that has begun to run rampant in American culture. And, I believe that cooking and eating at home can be less expensive than eating fast food, while delivering better nutrition, and thus can help boost food security in these times of economic hardship.
Food security is an issue that is close to my heart; I grew up in West Virginia and when my Dad was laid off of his job at Union Carbide for a year, and our savings account was drained, I remember not having much to eat. That is, until my Mom’s parents–my Grandma and Grandpa who had a farm–came to visit. Seeing a nearly bare cupboard, they brought us bags and bags of home-canned fruits and vegetables, and boxes of frozen pork, chicken and beef, as well as dozens of freshly laid eggs.
I will never forget how good that food tasted after eating very little but beans and cornbread for weeks. And I have always been generous and shared food with my less fortunate neighbors since then.
That’s why I work with a local non-profit organization called Community Food Initiatives here in Athens. CFI works to boost local food security in Athens and the surrounding areas by collecting donations of food and money at the Athens Farmer’s Market. The money collected there is then spent there among the vendors, and all of the food is then donated to local agencies such as food pantries, soup kitchens, homeless and domestic violence shelters, so that those who don’t have enough money for food have fresh, local, nutrient dense produce to eat.
The CFI also teaches classes in how to can, how to grow gardens, how to compost and how to grow fruit trees. I may end up teaching a series of classes on basic vegetable and fruit cookery; one of the issues that has consistently come up for the CFI is that community members often don’t know what to do with some of our most often donated vegetables such as greens, eggplant and summer or winter squash.
Which is how we come to the subject of this post.
On Thursday, while volunteering at the CFI Donation Station where we inventory the food that came in and divide it up to be picked up by folks from the various agencies we serve, it turned out that there was a surplus of eggplants, summer squashes of all sorts, tomatoes, onions and basil.
I decided to take some home and make a big batch of ratatouille to be given to The Athens Community Church which hosts a weekly free dinner on Friday night. It turns out that one of my neighbors is involved with the small food pantry that the church maintains, as well as being one of the cooks for the dinner, so I figured I could make the food and then take it straight to her house to donate it to the church.
So, about oh, I guess ten pounds or so of the aforementioned vegetables and herbs came home with me and I ended up spending a happy hour sauteing, slicing, peeling and mincing while a huge pot of increasingly headily scented stew bubbled on the stove.
Which, of course, is what ratatouille is–a vegetarian stew popular in Provence, France. Technically, basil isn’t used in the stew–parsley is, but I have to admit to always using basil in mine. I figure I’m not in France, so who cares, right? And, usually only zucchini is used in the stew, but well, I put yellow crookneck, zucchini, pattypan and some sort of baseball-sized round summer squashes in it, because that is what I was given.
And, usually, the eggplants used are the big fat European kind, but all we had left over was the long, thin, white or lavender Japanese varieties and the small, striped Indian ones. Which is fine with me–I honestly like the flavor and texture of the smaller eggplants better than the large ones anyway–they are less bitter and have fewer seeds while retaining the unctuous, smooth consistency in the flesh just like their larger deep purple cousins.
After adding a head of garlic and some cooking oil from my larder the donated vegetables and herbs were quickly turned into two and a half gallons of fragrant, sweet, heady stew which for all that it tastes rich, is low in fat and calories, but high in fibre and vitamins.
When my neighbor brought my storage container back after the dinner today, she was smiling. The ratatouille was a hit, so I’ll be sending along the recipe with her to give out among the diners. It even turned out that a vegetarian had shown up for the dinner and they were happy to have something so good for her to eat.
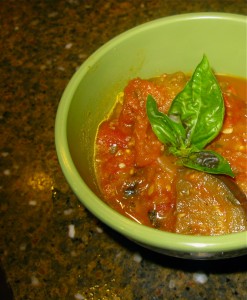
Anyway, here it is–my version of ratatouille–a dish that can be made for not so much money in the late summer when every one of its ingredients is not only in season and plentiful, but is actually glutting up the gardens of farmers and gardeners alike. But even though it is easy to make and easy on the pocketbook, ratatouille always tastes divine, no matter if you serve it hot or cold. (Oh, and don’t worry–I’m not giving a recipe that makes enough to feed a small army like I made on Thursday. Only enough for an average sized family of four to six.)
Ratatouille
Ingredients:
2 tablespoons olive oil
1 large sweet onion, peeled and thinly sliced
1 teaspoon salt
1 sweet red, yellow or orange bell pepper, cored and diced
2 large cloves garlic, minced
1/2 cup slightly sweet red wine
3 long, thin Asian eggplants, ends cut off, then cut in half longitudinally, then sliced thinly (about 1/4″ thick)
2 medium-sized zucchini, ends cut off and thinly sliced (1/4″ thick)
1 medium-sized yellow summer squash, ends cut off, cut in half longitudinally, then sliced thinly (1/4″ thick)
1 pound fresh tomatoes, skinned, seeded, cored and crushed with your hands
1/2 cup minced fresh basil
salt and pepper to taste
Method:
Heat the olive oil in the bottom of a large, heavy pot. Enameled cast iron is awesome for this, but a plain old stainless steel copper-bottomed soup pot works just as well.
Add the onion slices and sprinkle with salt and cook, stirring, until the onions turn pale yellow. Add the pepper, stir and cook until the onion is a nice deep gold and the pepper bits have started to brown slightly. Add the garlic, and cook until all is fragrant and the onions start to stick a bit to the pot.
Deglaze the pot with the wine and allow the alcohol to boil away.
Add the eggplant and squash and cook, stirring until the vegetables are soft and the squash have started to brown slightly. Add the tomatoes and their juice, and turn down the heat to simmer until the stew has thickened and is somewhat like a jam in consistency.
Stir in the basil and either serve immediately, hot, or you can cool it down, refrigerate it overnight and serve it cold. In either case, it is wonderfully delicious. Ratatouille can also be used as a pasta sauce, and though it is terribly untraditional to do so, I have to say that spaghetti twirled with this stew is mighty tasty. Definitely worth breaking rules to eat!
Beans, Beans, The Magical Fruit!
Let’s get beans and make some soup!
Actually, that isn’t how that little ditty goes.
The more traditional words to the rhyme go thusly:
Beans, beans, the magical fruit!
The more you eat, the more you toot!
The more you toot, the better you feel,
So eat some beans at every meal!
I learned the rhyme back in Girl Scouts. No, not officially–our troop leader nearly fainted dead away when we took to chanting it around the dinner table at our camp’s lodge. No, we learned it from one of my older cousins who had gone on the camping trip as a chaperone. You can see how seriously she took her duties.
Actually, in all fairness, she kept us girls safe, showed us how to tie useful knots, and helped us weave mats to sit on so we wouldn’t get wet in the grass. And she showed us how to build fires, too. She was a regular old Girl Scout except she had no use for those stuffy songs and boring chanted doggerel that the scout leaders taught us, so in our tent before we went to sleep the first night, she taught us the “Sacred Bean Chant,” which happened to come in handy since my mother had brought baked beans for dinner.
It was all good until some of us girls started whispering the “Sacred Bean Chant” to each other during the flag lowering ceremony when we were supposed to be singing “Taps.” Then, we got reprimanded for being bad citizens and all around troublemakers because we didn’t act properly solemn as the flag was lowered and folded.
Ah, well.
I’ve just never been good at solemn in my life. Never, ever. Even when marching in protest of violence against women (as a former battered wife, I take this issue seriously, deadly seriously) during a “Take Back the Night” event with my friend Kendra way back in 1993 here on Ohio University’s campus, I couldn’t stick with the program. For the record, neither could Kendra. We got to feeling silly and having too much fun stomping around and chanting, “Women Unite! Take Back the Night!” and I think it was actually Kendra who started a counter chant–and yes, it was the “Sacred Bean Chant.”
And well, I joined in.
And we chanted it alone for a while, but then a few other less than serious women joined us, and we got some stink eyes from the unsmiling “serious feminists” for not taking the march seriously. We finally felt a bit self-conscious and stopped near the end of the march when a bunch of women (Or were they wimmin? Womyn? Wommin? Dunno….) went even more off script than we had, went off the parade route, laid themselves down on Court Street, blocked traffic and were then summarily arrested.
Kendra and my little leguminous transgression suddenly seemed a bit tame in comparison.
So, what does all of this have to do with the point of this post?
Well, not a lot, but the stories are amusing.
Anyway, I’m writing about beans, specifically beans in soup.
I love bean soup. (I love soup in general, too, but again, I digress.) A favorite dinner when I was a kid was ham and navy bean soup, which was cooked with the ham bone and whatever bits of meat that fell off or could be nipped off the bone to be eaten in the soup. The marrow from the bone gave a deep richness to the beans, and the vegetables that were included- onions, celery and carrots- (with one lonely bay leaf) lent their lovely fragrances to the melange, and it all tasted so good together that it never occurred to me that it was an essentially frugal dish.
It was a means to use up every bit of goodness out of a ham, even extracting all of the juices and marrow from the bone so that we lost none of the flavor, meat or nutrients from the ham at all. After the soup was made the bone was always given to our dog, Rufus, who savored it for about a week before it was gone entirely.
But as good as the ham was, and thus as delicious as the broth was, it was the beans I loved. I could eat bowl after bowl of the beans and vegetables, with a few pink bits of ham, and then I’d drink the broth. It was so delicious, comforting and filling, especially on a cold winter evening, that it made our house seem warm and inviting, cozy, even.
Zak said the other night that soup sounded good for dinner the next day, and I had fresh horticultural beans in my refrigerator from the farmer’s market, and some ham (but no ham bone) in the freezer, so I went ahead and made a version of my childhood favorite soup that I’d like to share with you.
As I had no bone to enrich the broth, I added some vegetable juice and shiro (white) miso to the broth near the end of the cooking. I also added purple-skinned potatoes and used carrots of many colors, both from my garden, and added garlic as well. The miso made a lovely stand-in for the bone marrow, so lovely that I am pretty sure I could make a vegan version of this soup that would taste just as lovely as the omnivore version–it would just be different, that’s all.
Oh, and I added a great handful of minced fresh herbs and baby chard to the soup just before serving to give a final burst of flavor and color to an already savory dish.
As per usual, even with all the furbelews and frills, the beans wound up being the stars of the show. Fresh horticultural beans are like dried navy beans on steroids–plump, creamy and filled with earthy and slightly sweet flavor that eclipses the taste of the beans of my childhood.
Horticultural beans are, and I mean this truly and with no irony, “magical.”
Horticultural Bean and Ham Soup
Ingredients:
2 tablespoons olive oil
1 large onion, thinly sliced
1/2 teaspoon salt
1/2 pound ham cut into small dice
2 large cloves garlic, peeled and minced
1 bay leaf
2 tablespoons fresh rosemary leaves, chopped
5 carrots, peeled and sliced
1 stalk celery, cleaned and sliced
1 cup dry sherry or dry white wine
1 pound fresh horticultural beans (or soaked dried cannelini or cranberry beans)
2 1/2 quarts of chicken or vegetable stock or any mixture thereof
1/2 quart water
1/2 pound small potatoes, boiled in their skins then drained and quartered
8 ounces of V-8 or other vegetable juice
1 tablespoon shiro miso (I use Miso Master brand)
salt and pepper to taste
1/4 cup mixed fresh chopped herbs–I used more rosemary, sage, and Greek columnar basil–you use what you have or would like
1/2 cup young chard leaves, cut into a very thin chiffonade
Method:
Heat the olive oil in the bottom of a heavy-bottomed soup pot. Add onion, and sprinkle with salt, then cook, stirring until the onion turns slightly golden. Add the ham and continue cooking until the ham browns and the onions are nice and deep gold in color. Add the garlic, bay leaf and rosemary leaves and keep cooking until the onions are reddish gold and everything is fragrant.
Add the carrots and celery and cook until they brown very slightly–then deglaze the pot with the sherry or white wine, and boil until the alcohol evaporates. Add the beans and the stock(s) and water, and bring to a boil. Turn down to a simmer, and cook, covered with the lid slightly ajar, until the beans are mostly tender. Add the potatoes, and cook until the beans are fully tender.
Add the vegetable juice, and bring to a simmer. Remove 1 cup of the liquid into a bowl or measuring cup and add the miso to this separate broth. Stir the miso well into the broth. Turn off the heat under the soup and pour the miso/broth mixture back into the pot and stir well to incorporate throughout the soup.
Add salt and pepper to taste and 1/2 of the minced herbs.
Serve in bowls topped with some of the rest of the herbs and some of the chard as a garnish.
Note: In order to make this vegetarian, leave out the ham and use only vegetable stock in the soup, and up the miso amount to 2 tablespoons.
Our Documentary Has a Real Title
Filming on our food documentary has paused briefly this week while Dan finishes up some design work for a local non-profit organization, so I’m taking the time to do some administrative and writing work on the project. You know, work that doesn’t require the knowledge of how to work a huge expensive video camera!
Last week, however, the two of us conducted our first on-camera interview and shot some beautiful footage of cows, grass and morning sky out at Snowville Creamery. We interviewed Warren Taylor, the enthusiastic and articulate founder of the creamery and got to the farm just in time to get some beautiful shots of the cows walking to the milking barn in the clear, gold-tinged morning light.
This meant that two night owls had to pretend to be early birds and be up and out of our houses at 5:15 AM, and because it was so early, we got lost on our way out to the farm, BUT thanks to Dan’s GPS and navigational skills, we got there and got set up before the sun rose so it was all just fine. The light was so beautiful, we resolved to get up as early as possible for all on-farm shoots from now on.
Thank God for coffee, is all I can say.
The end result, however, was that the video and the stills we shot turned out beautifully, and gave the two of us more of an idea of how the trailer for the film, and the film itself will look. It helped us crystallize the surprisingly simpatico vision that exists in our two separate heads into one vision, and indirectly, it ended up giving Zak the idea for what will now be the title, not the working title, of the film.
Zak, who is doing the soundtrack for the film on both acoustic and electric guitar and Native American flute, came up with the title while he and I were driving back from Columbus on Tuesday.
“Hand to Mouth: The Athens, Ohio Food Cycle.”
Hand to mouth, of course, is an phrase that is often used in Appalachia to describe folks who are so poor that everything that they do is centered around having enough to eat. In this context, we want to turn the phrase on its head and show something that is usually a negative stereotype about our region–and reclaim the phrase, as it were, to mean, that which we grow and produce with our hands turns right around and feeds us instead of being shipped half a country away. The “food cycle” part of the title refers to the cycles of agriculture–the seasons, a time to plant, a time to reap, circular movements rippling outwards, ever moving and changing and growing.
So, that’s the news on the documentary. In the next few weeks, as soon as Dan is done with his current freelance project, we’ll return to a flurry of activity, going out to shoot in various locations around Athens and the surrounding counties, collecting footage to then turn into the trailer which we hope to have ready by the end of September, though we make no promises.
Making Flaky, Tender, Delicious Chapati
The very first chapati I ever had was not very good.
Mind you, it was made by an American friend whose cooking skills were less than impressive, from a recipe from an American vegetarian cookbook (one of the older ones where the recipes tended toward the “less-than-delicious vegetarian glop dishes” that used to be the norm way back in the day) by a cookbook author whom I am certain probably never tasted a well-made chapati in her life.
The first one I tasted I ate out of politeness, because it was a dry, cardboard-like affair that I could not imagine ANYONE in her right mind liking–much less an entire subcontinent of people not only liking it, but eating it often. I didn’t even get why anyone would call it a bread–it was more like a somewhat pliable cracker.
So that experience kept me from trying a proper chapati for years.
When I finally did try one, I had already fallen under the spell of naan, bhatura and pooris, so I was still somewhat skeptical of something as simply made as a griddle-baked flatbread being good.
But, the chapati I had made in the hands of a good cook was pretty good, so I could at least see why people liked them. However, compared to the glories that were naan, bhatura and poori–I didn’t find myself craving chapati.
Until I had a truly flakey, tender and delicious version, one that was subtly scented with spices and had an elusive nutty flavor that I soon recognized as coming not only from the usual whole wheat flour, but also some besan–toasted chickpea flour.
After tasting those chapati–I changed my mind about the formerly humble griddle baked flatbreads and decided I had to figure out how to make ones that tasted just like the ones at my favorite restaurant.
And so, I did.
My first task was to research recipes.
I looked online, but found no recipes that sounded exactly right, so I started digging through my three shelves of Indian cookbooks.
I found what I was looking for in one of oldest cookbooks–Julie Sahni’s Classic Indian Cooking, which is one of the cookbooks that taught me many of my first Indian recipes. Copyright 1980, this older book with very few illustrations and no photographs is truly a classic in the best sense of the word–and Sahni, the author, is not only very knowledgeable about Indian cookery, she is deftly able to put her knowledge onto paper in the form of step-by-step instructions easy enough for a beginner to follow without the benefit of illustrations.
What I found in Sahni’s tome is a recipe for “Besan ki Roti”, or chickpea flour flat bread. The spices she used in her recipe were not what I was aiming for, and the method she used for rolling out the dough would not result in as flaky a bread as I wanted (but I wasn’t worried about that as I had a pretty good idea as to how to make the breads flaky my own self–because I knew how to make flaky Chinese scallion pancakes, and was going to use the same technique here).
I also ended up adding a little bit of yogurt and ghee to the dough itself to tenderize it further–according to Sahni, the besan makes the dough stiffer and chewier than just using the usual durum atta flour that most cooks use to make chapati. Knowing well the tenderizing properties of fats and dairy products in bread dough, I decided to add some–and it turned out to be the correct decision.
Finally, instead of the usual method of cooking a chapati, which consists of baking for a few seconds on a flat, hot cast iron griddle, then passing it over on an open fire, I added a third technique–a short steaming (about 10-20 seconds) wrapped in a napkin in the microwave.
The result is a very flaky, tender, delicious chapati, just like the title of this post says. They are nutty, subtly scented with fenugreek and cumin and have a delicious nutty flavor and aroma, thanks to the small amount of besan. They taste perfect with any Indian dish–but I particularly like it with channa masala and safaid keema mattar.
The truth is, these chapati would be good with ANY Indian dishes. And even though my explanation of the technique is going to sound long, involved and difficult–it really isn’t. It takes longer to explain how to make these flatbreads than it does to make them. After I got the hang of it, I could cook a chapati, from pinching the bit of dough from the ball to rolling it out, rolling it up, rolling it out again, cooking it on the griddle, then over the fire, then in the microwave, in two minutes flat, give or take a second or two. One the rhythm is established, your hands will be able to go fast as lightning, and you will find yourself able to make a pile of these little breads for your friends and family in no time.
Flaky Chapati
Ingredients:
2 cups whole wheat chapati flour or regular whole wheat flour
1 cup all purpose flour
1/3 cup besan flour
1/4 teaspoon ground fenugreek seeds
1/8 teaspoon ground cumin
1/2 teaspoon salt
1 teaspoon ghee
1 tablespoon Greek style yogurt
1 1/8 cup to 1 1/4 cuo warm water (start with smaller measure, use more as needed)
all purpose flour for rolling out
melted ghee for rolling out
Method:
Either the morning of the evening you want your chapati or the night before, mix together the dry ingredients in a large bowl.
Oil your hands with a small amount of canola oil or ghee so the dough will not stick as you mix and stir the dough.
Stir in the ghee and yogurt with your fingers until mixture is crumbly, with a few little lumps like happens with a very shaggy pastry dough before you add the water. (Alternately, you can use a fork to mix in the ghee and yogurt, but I find it easier to just use my fingers to rub it in.)
Slowly stir in the water, mixing with your hand until the dough firms up enough to knead. Once the dough is firm, yet still slightly sticky, begin kneading with both hands until the dough is elastic and and smooth, yet still a bit tacky to the touch. (Not so sticky that it clings to your fingers, just not dry and silky like most yeast doughs are supposed to be after they are kneaded. It should just feel like it wants to grab onto your finger, but it doesn’t actually do it.)
Put the dough into a ziplock bag, and place in the fridge to rest for at least three hours, though, I like it best if I make the dough the night before and let it rest until lunch or dinnertime the next day. For whatever reason, the dough rested longer is much more pliable and soft when baked up than the fresher dough made just a few hours before and rested at room temperature.)
Remove the dough from the fridge about a half hour before you are ready to cook some chapati, then turn the dough out onto a flour-dusted surface, and knead it gently to warm it up and to dry up any surface moisture with the extra flour.
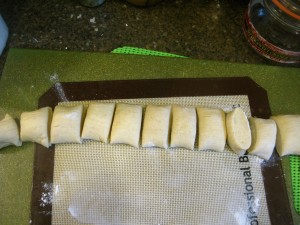
Now, there are two ways you can go about dividing the dough into little balls ready to be rolled into flatbreads. The way you are supposed to do it is to roll the dough in your hands into a big ball, then cut that in half. Set aside one piece of dough and seal it back up in the ziplock to keep it fresh and moist. The other piece of dough, you roll into a snake about 15 inches or so long and cut that into 12 equal pieces. Then you roll each of those pieces into a perfect ball and cover the ones you are not working with to keep them from drying out.
Or…you could be lazy like I got as I experimented with a couple of different batches of dough and just pull off a chunk of dough and roll it into a ball in your palms and call it good, while leaving the rest of the big dough ball covered. Having done it both ways, it works fine either way.
Then, you take your dough ball and flatten it into a disk between your palms. Make it look like a little UFO. Very cute, right? Then, you dust flour onto the rolling surface and set your disk down. Dust your rolling pin with flour and roll that disk out into as perfect a circle as you can manage, as thin as you can manage. Turn the dough a quarter turn between rollings if you want a perfect perfect circle, if you don’t care, just roll it out in different directions until you get a very thin (less than 1/8″ thick) roundish sheet of dough.
Brush with a little bit of melted ghee. Please do not go overboard with this. Just use a little bit. (In your head, or out loud, sing the backup singers’ part of Aretha Franklin’s “Respect,”–“Just a little bit, just a little bit, just a little bit–sockittome,sockittome….” etc. This helps you remember to go easy on the ghee.)
Then…start rolling that flat bread dough disk into a cigar or another snake like shape with your fingers. It won’t want to do this easily–ignore it and endeavor to persevere, and you will end up with a cylinder of dough before you know it. Stretch that dough out by pulling at either end and then spiral it inward upon itself into a snail or rosette shape, making it a flat disk once again, but this time, with a spiral design on it. Pinch the end to and along the spiral to hold it together–just nip the edges together with your fingers.
Then, dust it and the rolling surface with flour, dust your rolling pin and roll it out flat again.
Now, that all sounds very hard, but really, it takes much longer to explain and write it down than it does just to do it. Trust me. If you want more explanations of the technique, read my recipe for Scallion Pancakes.
Set your pancake aside on a lightly flour dusted surface and roll out another one. While you are rolling out a second chapati, start heating up your griddle.
Now, in India, these are cooked on a flat, round cast iron griddle called a tava. Not having one of those, I used a heavy cast iron skillet. You could also use a cast iron griddle, or even a cast iron Dutch Oven if that’s all you have, but whatever you use, make it a heavy, well-seasoned cast iron pan. If you don’t have cast iron, you should–go out and get a cast iron skillet and season and treat it well and your cooking will improve vastly. They aren’t that expensive, and if you’re lucky, you can find an old, blackened, well seasoned one in a relatives cupboard, forgotten and unused, or you can get one at a yard sale.
Anyway, I digress. Put your cast iron cooking surface on the burner and turn the heat up to high. Let it heat. Then, turn on the burner next to or behind that pan and just let it go. If you don’t have gas–you can still do this with electric, but it won’t have that fire-cooked aroma. But it will still work, so long as you have your burners on high.
Now, you need two other cooking implements. A spatula for flipping the chapati over on the griddle or skillet surface, and a set of tongs for picking it up and holding it over the live fire or the naked electric burner. Have these ready to hand. Also have a plate with a cotton napkin (or a paper towel) on it big enough to fold over the chapati at the ready.
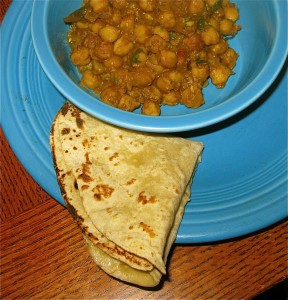
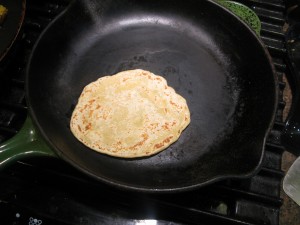
After you’ve rolled the second chapati, put the first one right onto the pre-heated cast iron cooking surface. Do not use grease, ghee or oil. Just the hot pan. In mere seconds it will cook on the first side. Flip it over with the spatula and you should see speckly brown spots on that side as pictured above at the beginning of the recipe. Leave it on the other side for a couple of seconds and then use the tongs to pick up the chapati and hold it over the flame or the hot naked burner. Flip it back and forth, this way and that, and watch in amazement as it finishes cooking and even puffs up in places. Isn’t that the coolest? It is.
After flipping it around over the fire for a few seconds–about ten or so total–don’t drop it in the fire and let it burn! After that, put it on the plate, fold the napkin over and microwave it on high for a mere 10-20 seconds. Remove, unwrap, brush one side with melted ghee and fold into quarters than put in a basket lined with a napkin and cover it up to keep it warm.
Continue cooking, then rolling and etcetera until you have enough chapati for a first serving for your family and friends. After that, turn off the burners and serve everything hot–it’s easiest to put the rice, curries and raitas and whatnot on the table first, have everyone fix their plates and sit down, then go and cook the chapati and bring them out all at once. If, after eating one chapati, folks want more, you can go and cook more, or teach them how to do it. You can roll, they can cook and everyone can be fat and happy.
That’s it. I promise that it sounds harder to do than it is–and the results are so worth the trouble of learning how to make these lovely little flatbreads that are nothing like the first unfortunate example I ate nearly twenty years ago in a friend’s kitchen.
Powered by WordPress. Graphics by Zak Kramer.
Design update by Daniel Trout.
Entries and comments feeds.

